Stirring a drum of wood lacquer that’s been sitting for a while
The Essential Guide to Stirring Settled Wood Lacquer in a Drum: Why & How to Do It Safely
Wood lacquer is a beloved finish for woodworkers, cabinetmakers, and DIYers alike—delivering durability, depth, and a smooth, glossy sheen. However, if you’ve ever opened a drum of wood lacquer that’s been sitting idle for weeks or months, you’ve likely noticed separation: solvents rise to the top, while resins and pigments settle into a thick sludge at the bottom. Stirring is non-negotiable to revive it, but doing it improperly can ruin your finish—or even create safety hazards.
In this guide, you’ll learn why lacquer settles, how to stir it correctly, and critical safety steps to ensure your finish performs flawlessly.
Why Stirring is Crucial for Lacquer Performance
Wood lacquer is a complex blend of resins, solvents, and additives. Over time, gravity pulls heavier components downward, while volatile solvents float upward. If left unstirred:
- Uneven Finish: Thin, solvent-heavy layers won’t bond properly, leading to streaks or fisheyes.
- Weak Protection: Settled resins mean poor film formation, reducing scratch/moisture resistance.
- Color Inconsistency: Pigmented or tinted lacquers may dry patchy or mismatched.
Stirring redistributes these components evenly, restoring the lacquer’s chemical balance.
Tools You’ll Need
- Stirring Stick/Paddle:
- Avoid wood: It can splinter or absorb solvents.
- Use: Stainless steel, aluminum, or plastic stir sticks (compatible with lacquer thinner).
- Paint Mixer Attachment (Optional):
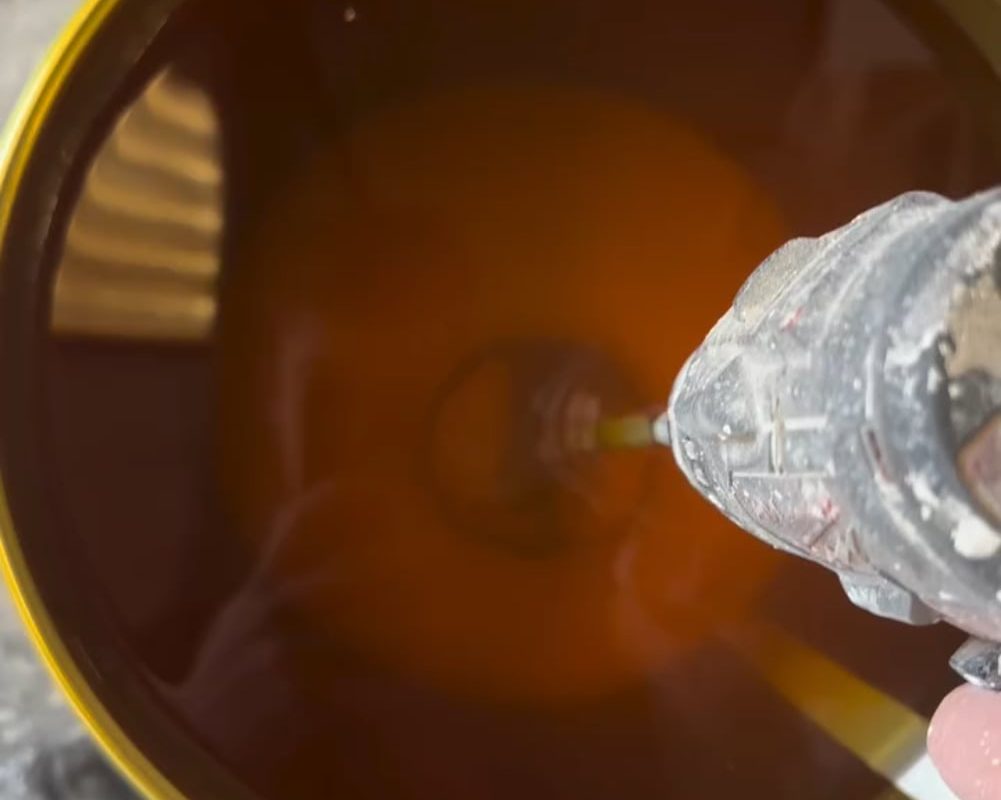
- Use a low-speed power drill with a paddle mixer for large drums (avoid high speeds to prevent bubbles).
- Safety Gear:
- Nitrile gloves
- Respirator mask (organic vapor cartridge)
- Safety goggles
- Ventilated workspace (open doors, fans, or outdoor area)
Step-by-Step Guide to Stirring Settled Lacquer
Step 1: Safety First
- Ventilate: Lacquer fumes are flammable and toxic. Work outdoors or in a well-ventilated workshop.
- No Sparks: Keep away from open flames, sparks, or static electricity (e.g., synthetic clothing).
Step 2: Inspect the Drum
- Check for skinning (a dried film on the surface). Remove it carefully with a strainer or filter.
- Ensure the drum isn’t rusted or damaged internally (contaminants can ruin the lacquer).
Step 3: Start Slow
- Hand-Stirring: Insert your stir stick to the bottom of the drum. Slowly lift and fold the bottom sludge into the solvent layer. Use a figure-8 motion—don’t whip or splash.
- Power Mixing: If using a drill attachment, run it at < 300 RPM. Insert deeply, tilt slightly, and move upward gradually.
Step 4: Test for Consistency
- Stir until the lacquer flows uniformly (10–15 minutes for a 5-gallon drum).
- Pro Tip: Dip a clean stick—no streaks or lumps should remain. If it’s grainy, strain through a mesh filter.
Step 5: Seal & Store Properly
- Wipe the drum’s rim clean before sealing to prevent hardening.
- Store in a cool, dry place (temperature swings accelerate separation).
Common Mistakes to Avoid
- Incomplete Mixing: Settled material can harden into cement-like clumps. Stir longer if needed!
- Using Reactive Materials: Metal paddles must be stainless—iron or copper can react with solvents.
- Rushing the Process: Speeding the drill creates bubbles, which cause pinholes in the finish.
- Ignoring Safety: Always prioritize ventilation and PPE—lacquer thinner is harmful if inhaled.
FAQ: Reviving Old Wood Lacquer
Q: How long can lacquer sit before it’s unusable?
Unopened drums last 1–2 years if stored properly. Stirring won’t save lacquer that’s gelled or smells rancid.
Q: Can I shake the drum instead of stirring?
Avoid shaking—it traps air bubbles and won’t blend settled solids effectively. Stick to slow, thorough stirring.
Q: What if the lacquer won’t blend smoothly?
If stubborn sludge remains, add a small amount of lacquer thinner (≤5% of total volume) and re-stir.
Conclusion: Stir Smart for Flawless Results
A well-stirred drum of wood lacquer ensures a smooth, durable finish ready for spraying, brushing, or wiping. By prioritizing slow, thorough mixing, safety precautions, and proper storage, you’ll extend the life of your finish and maximize your project’s quality. Next time you uncap that drum, remember: patience and precision are the keys to a perfect finish!
Pro Tip: Label your drum with the date opened and last stirred for easy tracking. For severely separated lacquer, consider a viscosity cup test to confirm consistency.
Need more wood finishing insights? Explore our guides on thinning lacquer, spray techniques, or troubleshooting common finish flaws!