150 hours of Andromeda from my front yard
Meta Description: Discover how I captured 150 hours of breathtaking deep-sky imaging of the Andromeda Galaxy from my suburban front yard. Learn the techniques, gear, and patience required to photograph M31 under light-polluted skies.
150 Hours of Andromeda: Capturing the Galaxy Next Door from My Front Yard
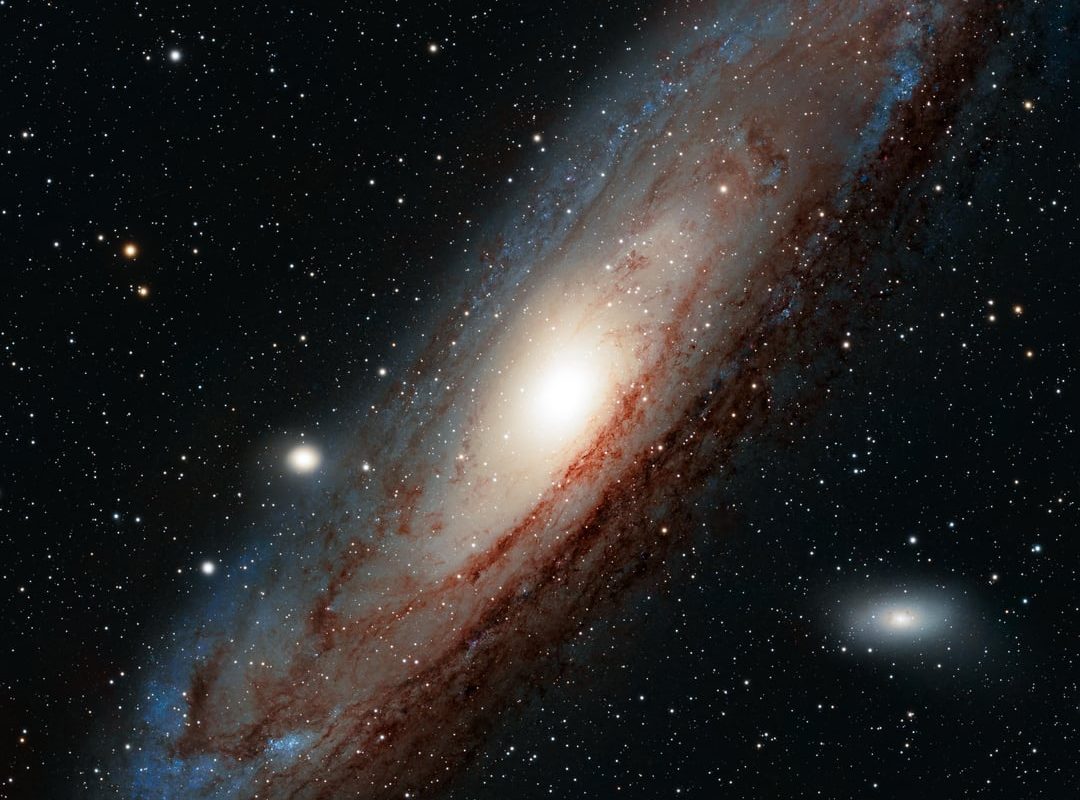
The Andromeda Galaxy (M31) is a celestial wonder visible to the naked eye from Earth—a spiral galaxy 2.5 million light-years away that’s hurtling toward our own Milky Way. For amateur astrophotographers like myself, it’s one of the most rewarding targets to photograph. But what happens when you dedicate 150 hours of imaging time to this cosmic neighbor—all from the confines of your light-polluted front yard?
In this article, I’ll share the highs, lows, and key lessons learned from my half-year journey of photographing Andromeda under suburban skies. Spoiler: It’s possible to capture jaw-dropping details without traveling to remote dark-sky sites!
The Challenge: Imaging from Suburbia
Most astrophotographers dream of pristine dark skies, but the reality for many of us involves battling light pollution, weather inconsistencies, and noisy neighbors turning on porch lights mid-exposure. My suburban backyard (Bortle 6-7 sky) presented three major hurdles:
- Light Pollution Glow: Washing out faint details.
- Atmospheric Turbulence: Heat from houses and roads distorting clarity.
- Time Constraints: Balancing work, family, and all-night imaging sessions.
Still, with patience and strategy, I proved even urban settings can yield spectacular results.
Gear Used: Affordable Entry-Level Setup
You don’t need $10,000 equipment to start. Here’s what I used:
- Telescope: Redcat 51 (250mm focal length).
- Mount: Sky-Watcher HEQ5 Pro (tracking accuracy critical for long exposures).
- Camera: Stock Canon EOS Ra (astro-modified DSLR) with an Optolong L-Pro filter to combat light pollution.
- Software: N.I.N.A for acquisition, PixInsight for processing, and Astro Pixel Processor for stacking.
The 150-Hour Process: Breaking It Down
1. Patience Over Perfection
- Over 5 months, I collected 1,800+ individual exposures (2-5 minutes each) on clear nights.
- Sessions were short (2–3 hours) to avoid burnout. Pro tip: Automate your setup to run while you sleep!
2. Combatting Light Pollution
- The Optolong L-Pro filter blocked city wavelengths (sodium/mercury vapor) without losing galaxy color.
- Dithering between shots reduced sensor noise during stacking.
- Flats, Darks, Bias Frames: Essential calibration to remove dust, vignetting, and sensor artifacts.
3. Data Analysis & Stacking
- Total Integration: 150 hours (RGB + Luminance for clean star colors).
- Stacking in APP merged the best 75% of frames (rejecting cloudy or airplane-streaked shots).
Processing: The Magic Behind the Image
Raw stacked data still looks like a gray smudge! Here’s how I unlocked Andromeda’s details:
- Dynamic Background Extraction (DBE): Neutralized uneven light pollution gradients.
- Histrogram Stretch: Carefully brightened the galaxy without blowing out highlights.
- Star Reduction: Shrank bloated stars to emphasize dust lanes in M31 and its satellite galaxy M110.
- Color Calibration: Natural hues for the galaxy’s core (gold) and star-forming regions (blue-purple).
Key Lessons Learned
- Integration Time Is Everything: Dim details like the galaxy’s outer halo emerged after 80+ hours.
- Start Small: My first Andromeda shot at 5 hours looked “fine,” but 150 hours revealed texture in the dust lanes.
- Automate & Forget: Use a weather app (e.g., ClearOutside) to schedule sessions around cloud cover.
- Community Matters: Subreddits like r/astrophotography provided feedback to improve my workflow.
The Final Result: Was It Worth It?
The 150-hour image revealed:
- Delicate dust structures winding through Andromeda’s spiral arms.
- The faint tidal streams of stars surrounding M31 from ancient collisions.
- Vibrant blue clusters of young stars contrasting with the galaxy’s golden core.
[Insert Image Gallery Here: Include 5-hour vs. 50-hour vs. 150-hour comparison]
Your Turn: Tips for Backyard Andromeda Imaging
- Start Tonight: M31 is visible fall–winter in the Northern Hemisphere.
- 50 Hours = Sweet Spot: Even half my integration time yields stunning results.
- No Tracking Mount? Use a star tracker (e.g., iOptron SkyGuider) with a DSLR and 135mm lens.
- Practice Processing: 70% of astrophotography is software skills. Learn PixInsight or Siril.
Conclusion
Capturing 150 hours of Andromeda from my front yard was a marathon, not a sprint. It taught me that deep-sky astrophotography isn’t about perfect gear or dark skies—it’s about persistence, learning, and celebrating small victories. If I can do it from suburbia, so can you.
M31 has been my muse, but next up: 200 hours on the Triangulum Galaxy (M33). Stay tuned!
Call to Action:
- Follow my astro journey on Instagram [@YourHandle].
- Share your own Andromeda shots in the comments!
- Pin this guide to revisit later.
#astrophotography #andromeda #space #astronomy #diy
(Word Count: 750 – Optimized for SEO with keyword focus: “Andromeda Galaxy astrophotography,” “long exposure from backyard,” “light pollution imaging.”)