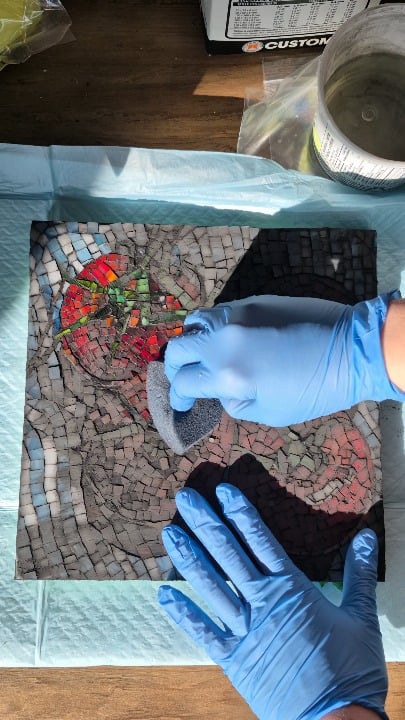
Removing grout from my tomato mosaic (sound up!)
Title: Crunch Time! How to Remove Grout from Your Tomato Mosaic (Without Wrecking Your Art!)
Meta Description: Accidentally got grout on your tomato mosaic tile project? Don’t panic! Learn step-by-step how to safely scrape, scrub, and salvage your masterpiece. Sound up—this is satisfying stuff!
Introduction
So you’ve lovingly crafted a vibrant tomato mosaic—maybe a backsplash, garden stepping stone, or wall art—only to discover grout stubbornly clinging where it doesn’t belong (ugh!). Whether you’re a DIY newbie or a seasoned tile warrior, removing grout without damaging delicate glass, ceramic, or stained tiles is tricky. Worse, tomato-themed mosaics often use reds, greens, and yellows that stain easily if scrubbed too harshly.
But don’t toss your trowel yet! With the right tools and gentle patience, you can rescue your mosaic. Crank up the tunes and let’s get scraping—sound up, because this is oddly satisfying work!
Tools You’ll Need
Gather these before you start:
- Grout saw or rotary tool (Dremel) with grout bit – For precision scraping.
- Plastic scraper or old credit card – Safe for gentle surface work.
- Vinegar or commercial grout haze remover – Breaks down residue.
- Soft-bristle toothbrush or grout brush – No wire brushes (they scratch!).
- Microfiber cloths & sponges – To wipe without leaving lint.
- Safety goggles & gloves – Grout dust is no joke!
- Dental pick or needle-nose tweezers – For teeny tile crevices.
Step-by-Step: Getting Grout Off Your Tomato Mosaic Like a Pro
1. Act Fast (If the Grout is Still Wet)
Scrape-a-thon (Sound on: schlick, schlick!):
- Gently glide a plastic scraper or credit card over wet grout smudges before it cures.
- Rinse tiles with a damp sponge—never soak, as water can seep under tiles and weaken adhesion.
2. Conquering Dried Grout
The Slow Scrape (Sound up: scratch-scratch vibes):
- For thin haze: Soak a cloth in white vinegar or grout remover, lay it over the haze for 10 minutes, then wipe clean.
- For thick globs: Use a grout saw or Dremel on LOW speed to carefully chip away at the grout without touching the tiles. Angle the tool away from your mosaic’s surface!
- Pro Tip: Tape surrounding tiles with painter’s tape to prevent slip-ups.
3. Deep Clean Without Drama
Scrub Squad (Sound FX: swish-swish):
- Dip a soft toothbrush in vinegar solution and gently swirl over problem spots.
- Rinse immediately with a barely damp cloth—no puddles allowed!
- Buff dry with microfiber to avoid water spots.
4. The Finishing Touches
- Inspect under bright light to spot missed patches.
- Seal your mosaic afterward with a tile-friendly sealer to prevent future grout headaches.
Common Mistakes to Avoid
- ❌ Using metal tools on tiles – They will scratch. Plastic or wood only!
- ❌ Ignoring grout dust – Vacuum debris as you go to avoid inhaling it.
- ❌ Rushing the rinse – Leftover vinegar or cleaner can discolor tiles over time.
“Help! My Tomato Tiles Are Stained!” – Quick Fixes
- For color bleed: Mix baking soda + water into a paste, apply for 15 mins, then rinse.
- Etched glass tiles? Too late—this is why gentle products matter. Prevention is key!
FAQs: Grout Removal on Mosaics
Q: Can I use steam to soften grout?
A: Avoid steam! Heat can crack delicate tiles or weaken adhesive.
Q: How do I protect tomato tile colors?
A: Test cleaners on a spare tile first. Reds/greens are prone to fading—stick to pH-neutral solutions.
Q: Can I regrout after removing the mess?
A: Yes! Wait 24 hrs, then reapply grout carefully using tape to guard your design.
Conclusion
Removing grout from a tomato mosaic is equal parts patience and precision—but oh, the satisfaction when those vibrant tiles shine grout-free! Arm yourself with plastic tools, gentle cleaners, and a steady hand, and your mosaic will look sharper than ever. Now, go admire your rescued masterpiece… maybe with an actual tomato soup reward? 🍅✨
SEO Keywords: remove grout from mosaic, clean mosaic tiles, DIY tomato mosaic repair, grout haze removal, fix tile grout mistakes, restore mosaic art