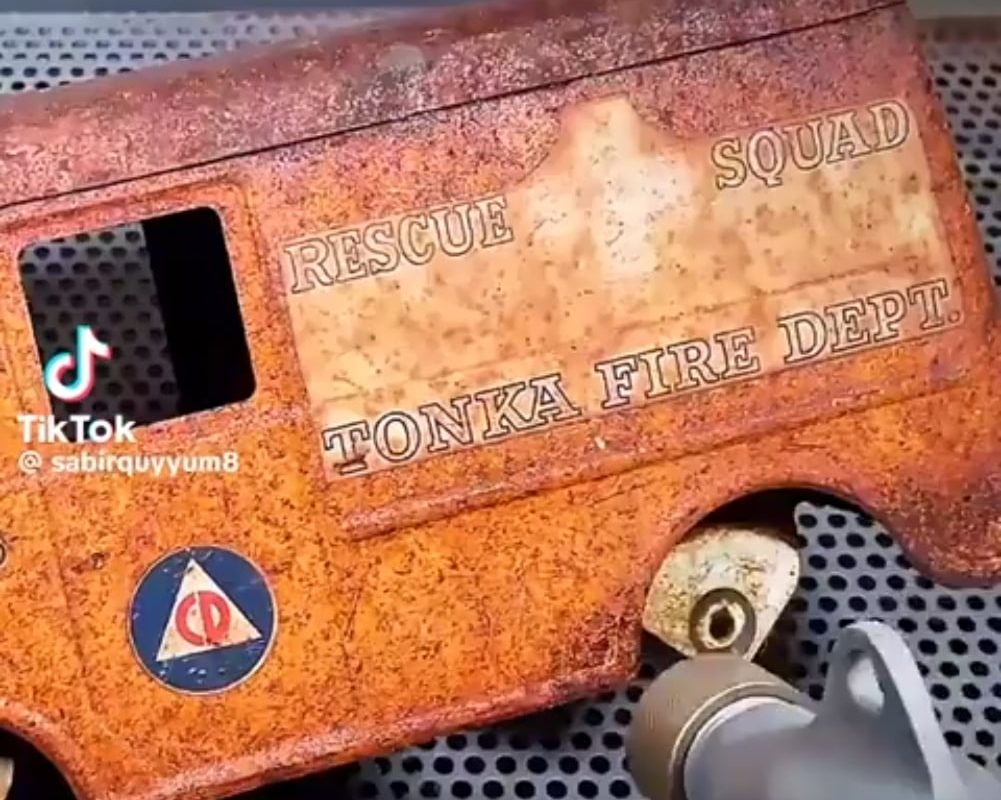
Restoring a tonka toy
Title: How to Restore a Vintage Tonka Toy: A Step-By-Step Guide to Reviving Childhood Memories
Meta Description: Learn how to restore a classic Tonka toy with this expert guide! Discover safe cleaning, rust removal, repainting, and preservation tips to bring your vintage treasure back to life.
Introduction
For generations, Tonka trucks have symbolized rugged playtime adventures. These iconic steel toys, first introduced in 1947, were built to withstand rough handling and years of imaginative play. If you’ve stumbled upon a rusty or worn Tonka toy in your attic or at a flea market, restoring it can preserve its nostalgic charm or even boost its value. This guide walks you through restoring a Tonka toy safely and effectively, turning a forgotten relic into a gleaming showpiece.
Why Restore a Tonka Toy?
Tonka toys—especially pre-1980s models made from solid steel—are highly collectible. A well-restored vintage Tonka dump truck, crane, or bulldozer can:
- Preserve family heirlooms: Many Tonka toys are passed down through generations.
- Enhance collectible value: Rust-free, intact models fetch higher prices among toy collectors.
- Spark joy: Displaying a revived Tonka toy celebrates childhood nostalgia and craftsmanship.
Pro Tip: While some collectors prefer patina (light wear), a full restoration is ideal for heavily damaged toys.
Essential Tools & Supplies
Before starting, gather these materials:
- Safety Gear: Gloves, goggles, and a respirator mask (for paint/solvent fumes).
- Cleaning Tools: Soft brushes, microfiber cloths, mild dish soap, and white vinegar.
- Rust Removal: Steel wool, sandpaper (120–600 grit), rust dissolver (e.g., Evapo-Rust®).
- Repair Tools: Metal epoxy, pliers, and a small hammer for dents.
- Painting Supplies: High-quality spray paint (Krylon® or Rust-Oleum®), primer, and clear sealant.
- Decals: Reproduction Tonka decals (available on eBay or specialty sites).
- Replacement Parts: Wheels, axles, or shovels from salvage toys or online sellers.
Step 1: Assess the Damage
Start by inspecting your Tonka truck for:
- Rust spots (surface or deep corrosion)
- Dents or bends in the metal
- Missing parts like doors, buckets, or wheels
- Original paint and decals (note colors/patterns for accuracy)
Preserve original decals if possible—they’re rare and add authenticity!
Step 2: Deep Cleaning
Goal: Remove dirt, grease, and loose rust without harming intact paint.
- Hand Wash: Scrub the toy with warm water, dish soap, and a soft brush.
- Rust Soak: For stubborn rust, soak parts in white vinegar or a commercial rust remover for 1–12 hours (check progress frequently).
- Dry Thoroughly: Wipe with microfiber cloths and air-dry completely.
Avoid harsh chemicals like bleach—they can strip paint or discolor metal.
Step 3: Repairing Dents & Damage
Minor dents can be fixed with care:
- Hammer Out Dents: Place the toy on a soft cloth and gently tap dents from the inside using a rubber mallet.
- Fill Gaps: Use metal epoxy for cracks or broken seams. Sand smooth once dry.
- Replace Missing Parts: Salvage parts from donor toys or buy replicas.
Never use power tools—Tonka steel is thin and prone to warping.
Step 4: Remove Rust & Prepare for Paint
For severe rust:
- Sand Lightly: Use 120-grit sandpaper to remove flakes, then switch to 400-grit for smoothing.
- Apply Primer: Spray a thin layer of rust-inhibiting primer to prevent future corrosion.
- Mask Decals: Cover any preserved decals with painter’s tape.
Test solvents on a small area first—some original Tonka paints react poorly.
Step 5: Repainting Your Tonka Toy
Tonka’s classic colors include Construction Yellow, Fire-Engine Red, and Royal Blue.
- Choose Paint: Opt for enamel spray paints for durability.
- Apply Thin Coats: Spray in a well-ventilated area, holding the can 8–12 inches away. Let dry between coats.
- Seal with Clear Coat: Protect the finish with a glossy or matte sealant.
Tip: Faded paint can create a charming “vintage” look—sand lightly for a distressed finish.
Step 6: Restoring Decals & Final Touches
- Reproduce Decals: Find accurate replicas online (e.g., TonkaMuseum.com or eBay).
- Apply Carefully: Use tweezers and decal solution for bubble-free placement.
- Reassemble Parts: Attach wheels, shovels, and other fittings once dry.
Step 7: Preservation Tips
Keep your restored Tonka looking fresh for decades:
- Avoid Water & Direct Sunlight: Prevent rust and paint fading.
- Dust Regularly: Use a soft brush to maintain shine.
- Light Wax Coat: Apply automotive wax yearly for extra protection.
Common Tonka Restoration Mistakes to Avoid
- Over-sanding: Strips original paint and details.
- Using Low-Quality Paint: Leads to chipping or mismatched colors.
- Ignoring Safety: Always wear masks and gloves when handling chemicals.
Conclusion: Reliving the Magic
Restoring a Tonka toy isn’t just a DIY project—it’s a tribute to timeless craftsmanship. With patience and care, even the rustiest Tonka dump truck can roar back to life, ready to inspire the next generation of builders. Whether you’re preserving childhood memories or diving into toy collecting, this guide ensures your Tonka shines with renewed glory.
Got questions? Share your Tonka restoration story in the comments below!
Final SEO Keywords
- How to restore a Tonka truck
- Vintage Tonka toy restoration
- Clean rust off metal toy
- Tonka truck repair guide
- Refinishing old Tonka trucks
- Collectible Tonka restoration tips
By following this guide, your restored Tonka toy will not only look amazing but also rank in searches for vintage toy enthusiasts!