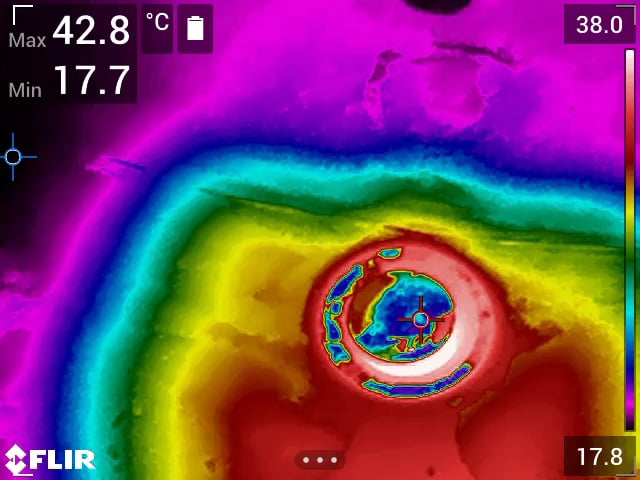
Switching between hot and cold water with a thermal imaging camera.
Capturing the Invisible: How Thermal Imaging Cameras Reveal Hot and Cold Water Transitions
Plumbing mysteries—like hidden leaks, temperature inconsistencies, or poorly insulated pipes—can be costly and frustrating. Traditional methods often involve guesswork, demolition, or invasive inspections. But what if you could visualize temperature changes in real time, without tearing down walls? Enter thermal imaging cameras, the game-changing tool that lets you “see” the invisible flow of hot and cold water.
In this guide, we’ll explore how thermal cameras work for plumbing diagnostics, their practical applications, and how switching between hot and cold water unlocks critical insights.
Why Use a Thermal Camera for Water Systems?
Thermal imaging cameras detect infrared radiation (heat) and convert it into visible images called thermograms. These color-coded maps highlight temperature differences with startling clarity, making them ideal for:
- Locating hidden pipes behind walls, floors, or ceilings.
- Pinpointing leaks in supply lines, drains, or underfloor heating systems.
- Evaluating insulation efficiency by identifying heat loss or cold spots.
- Diagnosing valve malfunctions (e.g., failed mixing valves or tempering devices).
Bonus: Thermal inspections are non-invasive, saving time, money, and demolition headaches.
How Hot/Cold Water Switching Enhances Thermal Imaging
Thermal cameras rely on contrast to detect anomalies. By switching water temperatures, you create dramatic thermal shifts that expose:
🚿 1. Pipe Routing & Layout
If you don’t know where your pipes run, simply:
- Turn on hot water at a faucet/shower.
- Scan the area with a thermal camera—hot pipes will glow brightly (red/yellow).
- Switch to cold water, and the same pipes will darken (blue/purple) as they cool.
This “before and after” reveals the pipe’s path, helping you avoid accidental damage during renovations.
🚰 2. Hidden Leaks
Slow leaks often go unnoticed until mold or structural damage appears. To detect them:
- Run hot water through the suspected pipe.
- Turn off the water and scan for “hot streaks” where heat lingers abnormally (a sign of trapped moisture).
- Reverse the test with cold water to confirm consistency.
Pro Tip: Wet patches cool slower than dry surfaces, creating a telltale thermal signature.
❄️ 3. Insulation Gaps
Poorly insulated pipes waste energy and risk freezing. After switching temperatures:
- Hot pipes should retain heat evenly along their length. Cold spots indicate missing/damaged insulation.
- Cold pipes in unconditioned spaces (like basements) should stay close to ambient temps. Warming suggests heat intrusion.
🛠️ 4. Faulty Mixing Valves
Mixing valves blend hot and cold water to prevent scalding. If your shower fluctuates between extremes:
- Use a thermal camera to scan the valve while adjusting the temperature.
- A malfunctioning valve will show uneven blending or delayed response in thermal patterns.
🔥 5. Underfloor Heating Checks
Activate the heating system, then switch it off and run cold water through the pipes. Thermal imaging will highlight:
- Blockages (cool zones where water isn’t flowing).
- Leaks (heat lingering in unintended areas).
Performing a Thermal Inspection: Step-by-Step
-
Prep Your Space
- Turn off HVAC systems to stabilize ambient temperatures.
- Ensure pipes are accessible (expose valves, manifolds, or visible sections).
-
Set Up Your Camera
- Adjust emissivity (0.95 for most pipes).
- Select an appropriate temperature range (-20°C to 150°C is typical for residential plumbing).
-
Run Hot Water
- Open taps/showers for 2–3 minutes until pipes reach peak heat.
- Capture thermal images of critical junctions, walls, or floors.
-
Switch to Cold Water
- Let cold water flow for the same duration.
- Repeat scans—the contrast will highlight abnormalities like leaks or clogs.
-
Compare Images
- Overlay hot/cold thermograms to spot inconsistencies.
- Focus on areas where temperature changes lag or deviate from expected patterns.
Thermal Camera Limitations & Safety Tips
While powerful, thermal imaging has caveats:
- Emissivity Errors: Reflective surfaces (e.g., copper pipes) can distort readings. Use matte tape for accuracy.
- Depth Limits: Cameras detect surface heat only. Pipes buried deep in concrete may require complementary tools (e.g., ultrasound).
- Expertise Required: Interpreting thermograms takes practice. For critical issues, hire a thermal inspection professional.
Safety First:
- Avoid scanning boilers or steam pipes without protective gear.
- Always shut off water/electricity before invasive checks.
Who Benefits from Thermal Water Inspections?
- Homeowners: Spot hidden leaks before they cause structural damage.
- Plumbers: Reduce diagnostic time and offer clients visual proof of issues.
- Insurance Adjusters: Validate water damage claims with irrefutable thermal evidence.
- Energy Auditors: Identify insulation gaps to improve efficiency.
Frequently Asked Questions
Q: Can I use a smartphone thermal camera for plumbing?
A: Basic models work for simple tasks (e.g., finding pipes), but professional-grade cameras (like FLIR or Seek Thermal) offer higher resolution and accuracy.
Q: How much does a thermal imaging inspection cost?
A: DIY cameras start at $200–$500. Professional inspections range from $300–$800, depending on property size.
Q: Will thermal imaging work on PVC pipes?
A: Yes, but PVC has lower emissivity than metal. Adjust your camera settings or apply a non-reflective coating.
Conclusion: See Beyond the Surface
Switching between hot and cold water isn’t just for showers—it’s a strategic diagnostic tool when paired with thermal imaging. By leveraging temperature contrast, you can uncover hidden plumbing flaws, optimize energy use, and prevent costly repairs. Whether you’re a DIY enthusiast or a seasoned pro, a thermal camera transforms invisible water issues into visible solutions.
Ready to explore? Check out thermal camera rentals or consult a certified thermographer for your next plumbing project!
Meta Description: Discover how thermal imaging cameras expose hidden plumbing issues by switching between hot and cold water. Learn step-by-step inspection techniques, applications, and cost-saving tips.
Target Keywords:
- Thermal imaging for plumbing leaks
- Hot and cold water pipe detection
- Thermal camera water inspection
- Infrared plumbing diagnostics
- Detect water temperature variations
Optimize your home or business today—equip yourself with the power of thermal sight! 🔍🔥🚿