Source: Dominik Hülsmann
Meta Title:
The Complete Guide to Deburring Plexiglass: Smooth Edges for Professional Results
Meta Description:
Learn safe & effective methods for deburring plexiglass (acrylic) edges. Discover tools, techniques, and tips for flawless DIY finishing.
The Essential Guide to Deburring Plexiglass: Techniques, Tools, and Safety Tips
Plexiglass (acrylic glass) is a versatile, shatter-resistant alternative to traditional glass, widely used in DIY projects, signage, displays, aquariums, and industrial applications. However, cutting or machining plexiglass often leaves behind rough, jagged edges called burrs, which detract from aesthetics and pose safety risks. Proper deburring is crucial to achieve smooth, professional results—and this guide covers everything you need to know to master the process.
Why Deburring Plexiglass Matters
Burrs form when cutting, drilling, or machining disrupts the acrylic’s surface. These imperfections are more than cosmetic nuisances:
- Safety Hazards: Sharp edges can cause cuts during handling.
- Structural Weakness: Micro-cracks in burred edges can expand, leading to fractures.
- Optical Clarity: Rough edges scatter light, reducing transparency on clear panels.
- Professional Finish: Polished edges elevate the look of DIY projects or commercial products.
6 Best Methods to Deburr Plexiglass
1. Sanding by Hand
Best for: Small projects, precision work, and gradual edge refinement.
Steps:
- Start Coarse: Use 120–180 grit sandpaper to remove large burrs.
- Progress Finer: Move to 220–400 grit paper to smooth scratches.
- Final Polish: Finish with 600–1200 grit for near-transparent edges.
Pro Tip: Wrap sandpaper around a block for even pressure. Use wet/dry sandpaper with water to minimize dust and prevent overheating.
2. Flame Polishing
Best for: High-gloss, professional edges on thicker acrylic (≥3mm).
Steps:
- Sand edges to 400+ grit first for a smooth base.
- Pass a propane torch or butane lighter flame quickly along the edge.
- Keep the flame moving—overheating melts or bubbles the acrylic.
Warning: Work in a ventilated area. Practice on scrap pieces first!
3. Router Deburring
Best for: Large-scale or production work with power tools.
- Use a router fitted with a chamfer bit or round-over bit.
- Set the depth to shave off a thin layer of the edge.
- Move steadily to avoid melting from friction heat.
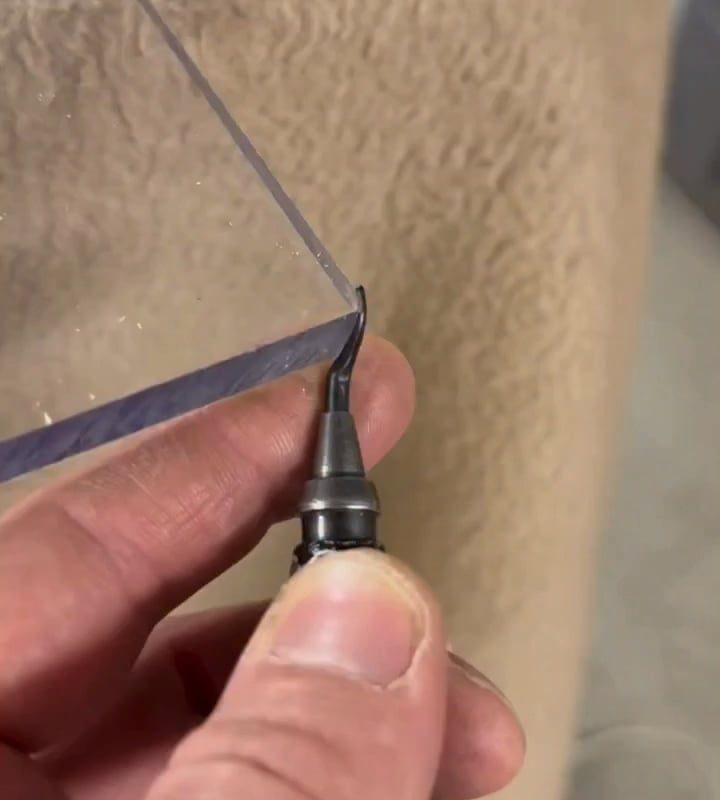
4. Deburring Tools & Blades
Best for: Quick edge cleanup after CNC or laser cutting.
- Manual deburring tools (e.g., X-Acto knives) scrape off thin burrs.
- Specialty acrylic deburring blades (e.g., Hook Blade) contour edges neatly.
5. Filing
Best for: Curved edges or hard-to-reach spots.
- Use a fine-tooth metal file or diamond file in gentle strokes.
- Finish with sandpaper for a flawless surface.
6. Buffing Wheels & Compounds
Best for: Restoring optical clarity to edges.
- Apply a plastic polishing compound to a buffing wheel.
- Run the wheel along the edge at low-to-medium speed.
Essential Safety Tips
- Wear PPE: Safety goggles and a dust mask protect against acrylic particles.
- Ventilation: Flame polishing releases fumes—work outdoors or near an exhaust fan.
- Avoid Melting: Use light pressure when sanding/routing; pauses prevent heat buildup.
- Secure the Workpiece: Clamp acrylic sheets to prevent slippage.
Common Mistakes to Avoid
- Skipping Grit Progressions: Jumping to fine sandpaper early prolongs the process.
- Overheating Edges: Excessive friction (from power tools) melts acrylic.
- Ignoring Dust Removal: Wipe edges with a microfiber cloth between sanding stages.
Tools & Materials Checklist
- Sandpaper (120–1200 grit)
- Sanding block or orbital sander
- Deburring tool/hook blade
- Router with acrylic-safe bits
- Propane torch (for flame polishing)
- Polishing compound
- Safety gear (goggles, mask, gloves)
Final Touches: Level Up Your Finish
After deburring, enhance your plexiglass project:
- Polish with Scratch Removers: Products like Novus polish eliminate fine marks.
- Apply Edge Sealer: Acrylic solvent sealers (e.g., Weld-On) waterproof edges.
- Protective Film: Leave the factory film on during work to prevent scratches.
Conclusion
Deburring plexiglass transforms jagged, dangerous edges into sleek, professional finishes. Whether you choose hand sanding, flame polishing, or power tools, patience and technique are key. Follow this guide to elevate your acrylic projects from amateur to exhibition-grade—safely and efficiently.
Pro Tip: Always practice new methods on scrap plexiglass first. Mastery comes with experience, but pristine edges are worth the effort!
SEO Keywords:
Deburring plexiglass, Smooth acrylic edges, Flame polishing acrylic, Plexiglass finishing, How to remove burrs from acrylic, Acrylic edge polishing, DIY plexiglass projects, Sanding plexiglass, Acrylic safety tips.