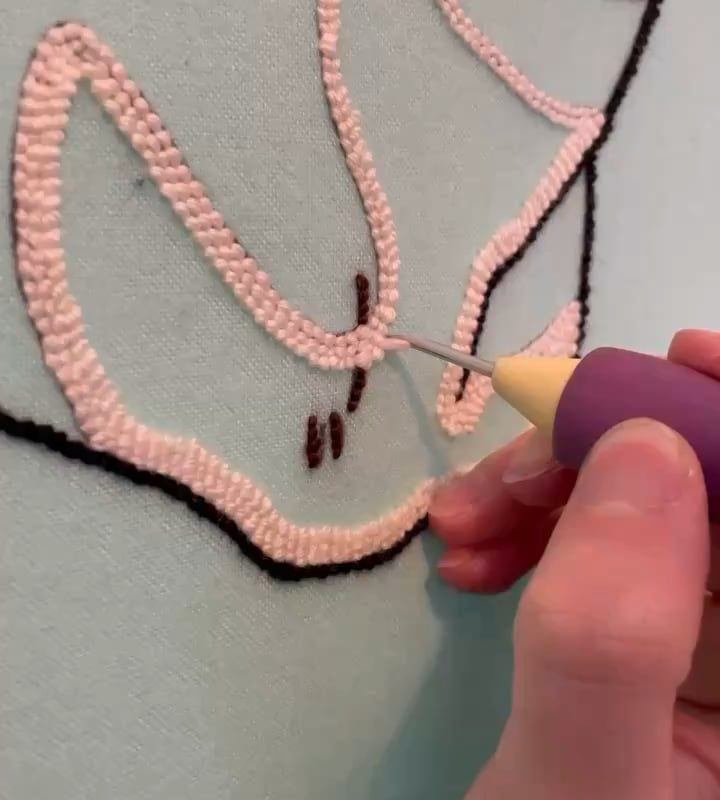
Behind the scenes of embroidering a pronghorn antelope wall hanging. Punch needle is a form of embroidery that is somewhat similar to a miniature version of rug tufting, but done by hand
Gotta love that satisfying punch noise
[OC]
How to Create a Stunning Punch Needle Antelope: A Step-by-Step Guide
Punch needle art is a versatile and rewarding craft that combines texture, color, and creativity. Antelopes, with their elegant shapes and iconic horns, make for a striking subject. This guide will walk you through the process of creating a punch needle antelope wall hanging or pillow, perfect for showcasing your skills or gifting to a nature-loving friend.
Why Choose an Antelope Design?
Antelopes symbolize grace, agility, and wilderness, making them a captivating choice for fiber art. Their slender bodies, sweeping horns, and intricate leg details offer an ideal balance of simplicity and challenge for punch needle artists. Whether you opt for a realistic portrayal or a whimsical abstract design, the result will be a unique piece brimming with texture.
Materials You’ll Need
Here’s what to gather before you start:
- Punch needle tool: Choose a fine-tipped needle (e.g., size 10) for detailed outlines.
- Yarn: Worsted-weight cotton or wool yarn works best. Earth tones like tans, browns, and grays suit an antelope pattern.
- Fabric: Monk’s cloth or linen with a tight weave (at least 12” x 12”).
- Transfer tools: Water-soluble pen, carbon paper, or a stencil.
- Embroidery hoop or stretcher bars (optional but recommended).
- Scissors and fabric glue for finishing.
- Pattern/sketch: Find a simple antelope silhouette online or sketch your own.
Step 1: Design Your Antelope Pattern
Start by selecting or drawing your antelope design. For beginners, a side-profile silhouette with minimal shading works well. Focus on defining key features:
- The curved horns
- A slender neck
- Delicate legs
- A small tail
Pro Tip: Use Pinterest or free vector sites (like Freepik) for inspiration. Resize the design to fit your fabric dimensions.
Step 2: Transfer the Design to Fabric
Stretch your fabric into an embroidery hoop or secure it to a frame to ensure tension (critical for clean loops!). Transfer your pattern using one of these methods:
- Trace directly with a water-soluble pen.
- Use carbon paper to imprint the outline onto the fabric.
- Project the design onto the fabric with a lightbox or tablet screen.
Step 3: Thread Your Punch Needle
- Cut a 3–5-foot yarn strand and thread it through the needle’s eye from the back.
- Pull the yarn down through the needle’s shaft until a few inches protrude from the tip.
- Adjust the needle’s depth setting to control loop height (shallow for details, deep for fluffier texture).
Step 4: Punching Technique
Working from the back side of the fabric:
- Start with the outline: Punch along the antelope’s silhouette to define its shape.
- Fill in negative space: Punch the background first (e.g., desert or grassland) to create depth.
- Add details: Use contrasting yarn for horns, eyes, or patterns on the fur.
- Keep stitches close together to avoid gaps.
- Always keep the needle perpendicular to the fabric for uniform loops.
Step 5: Finishing Touches
- Secure loose ends: Dab fabric glue on the back side to lock stitches.
- Trim excess fabric around the edges, leaving a 1–2” border.
- Frame or stuff:
- For wall art: Secure the finished piece in an embroidery hoop.
- For pillows: Sew the punched fabric to a complementary backing fabric.
Tips for a Professional Finish
- Color Selection: Experiment with gradients—mix cream and beige yarns for a lifelike coat.
- Texture Play: Combine tight loops (for the body) with longer loops (for grassy backgrounds).
- Avoiding Mistakes: If stitches loosen, adjust fabric tension or use smaller needle settings.
Frequently Asked Questions (FAQ)
Q1: Can I use punch needle for 3D projects like stuffed animals?
Yes! Once punched, cut out your antelope shape, glue the seams, and stuff with polyester filling.
Q2: What if I don’t have monk’s cloth?
Try burlap or evenweave fabric, but ensure it won’t snag the needle.
Q3: How long does a project take?
A small antelope (8” x 8”) takes 3–5 hours for beginners.
Final Thoughts
Creating a punch needle antelope merges the tranquility of fiber art with the beauty of wildlife. Whether you’re a seasoned crafter or a punch needle novice, this project offers endless creative freedom. Share your finished piece on social media or gift it to someone who adores nature-inspired décor!
Ready to start punching? Tag #PunchNeedleAntelope to inspire fellow crafters!
SEO Keywords: punch needle antelope, punch needle tutorial, DIY wool art, wildlife punch needle, rug hooking antelope, punch needle wall hanging, fiber art project.