My First Photo Of Any Planetary Nebulae – The Dumbbell Nebula.
Title: My First Photo of a Planetary Nebula: Capturing the Dumbbell Nebula (M27)
Slug: first-planetary-nebula-photo-dumbbell-nebula
Meta Description: Discover the thrill of astrophotography as I share my journey capturing my first planetary nebula—the iconic Dumbbell Nebula (M27)—from equipment to processing tips.
My First Photo of Any Planetary Nebula: The Dumbbell Nebula (M27)
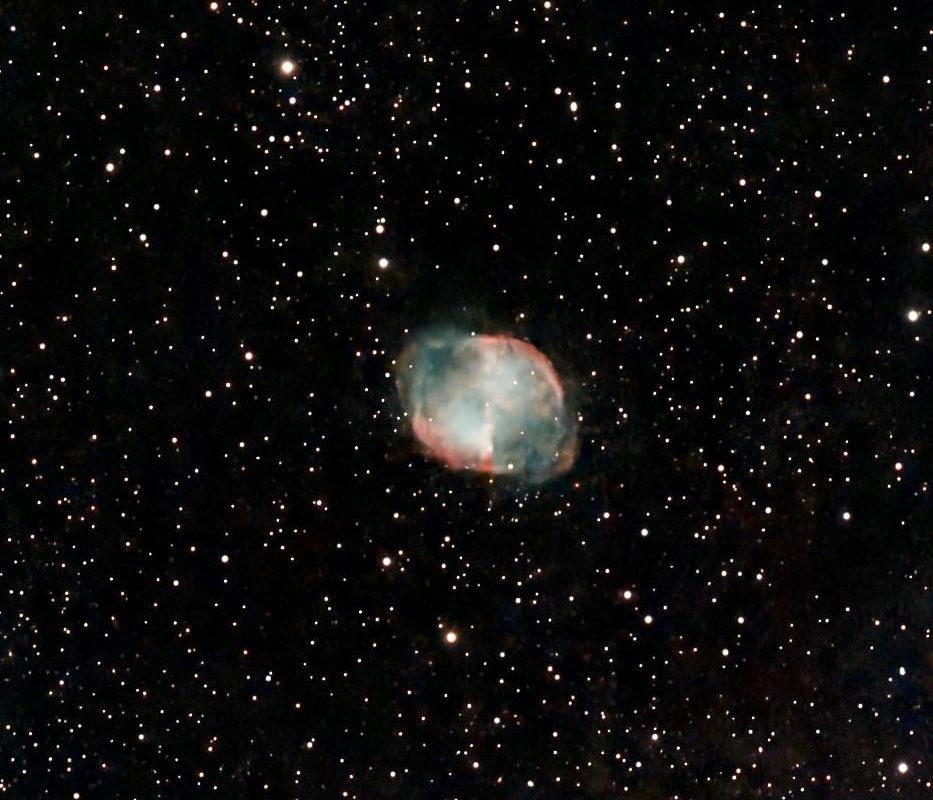
There’s nothing quite like the moment you capture your first deep-sky object. For me, that milestone was photographing the Dumbbell Nebula (Messier 27 or M27), a stunning planetary nebula in the constellation Vulpecula. This cosmic gem, located roughly 1,360 light-years away, is one of the brightest and most accessible nebulas for beginner astrophotographers. In this article, I’ll walk you through my experience, the gear I used, and the lessons I learned along the way.
What Is the Dumbbell Nebula?
Before diving into my photo journey, let’s unpack why M27 is such a popular target:
- Age & Formation: Formed ~10,000 years ago when a dying star expelled its outer layers.
- Appearance: Resembles a dumbbell or apple core, spanning 4.5 light-years across.
- Significance: The first planetary nebula ever discovered (Charles Messier, 1764).
M27’s brightness (magnitude +7.5) and relatively large apparent size make it ideal for small telescopes and beginner-friendly cameras.
My Astrophotography Setup
You don’t need a $10,000 rig to photograph the Dumbbell Nebula! Here’s the budget-friendly gear I started with:
- Telescope: A 6-inch Schmidt-Cassegrain (Celestron NexStar 6SE).
- Mount: Entry-level equatorial mount (Sky-Watcher HEQ5 Pro).
- Camera: Unmodified DSLR (Canon EOS Rebel T7).
- Accessories: A 0.63x focal reducer to widen the field of view.
Note: A light pollution filter (like the Optolong L-Pro) helped combat my suburban Bortle 6 skies.
The Challenge: Capturing M27
Planning the Shot
M27 is visible from late spring to early autumn in the Northern Hemisphere. I used free tools like Stellarium and AstroHopper to pinpoint its location. After polar-aligning my mount, I aimed for 90-minute total exposure time—a sweet spot for balancing signal and noise.
Camera Settings
- Exposure: 90 seconds per sub-exposure (ISO 1600).
- Total Integration: 45 minutes (30 lights + 15 darks/flats).
- F/ratio: f/6.3 (thanks to the focal reducer).
The “Aha!” Moment
Seeing the first unprocessed subs on my camera screen was exhilarating! Even in raw frames, the nebula’s oval shape and faint green-blue hues were unmistakable.
Post-Processing: Bringing M27 to Life
Software Workflow:
- Stacking: Combined frames with DeepSkyStacker to reduce noise.
- Initial Stretch: Used Adobe Photoshop’s Curves/Levels to reveal the nebula’s structure.
- Color Enhancement: Isolated hydrogen-alpha and oxygen-III signals with subtle saturation boosts.
- Noise Reduction: Applied AstroFlat Pro and Topaz DenoiseAI for a clean finish.
The final image revealed intricate lobes, a faint outer halo, and the central white dwarf star—proof that patience pays off!
5 Lessons I Learned
- Polar Alignment Is Everything: Even small drift ruins subs.
- Longer Exposures > More Subs: Prioritize quality subs over quantity.
- Don’t Skip Calibration Frames: Darks/flats saved my image from gradient hell.
- Start Small: M27’s size fits perfectly in a 6-inch scope’s FOV.
- Embrace Imperfections: My first edit was noisy—and that’s okay!
Why the Dumbbell Nebula Is Perfect for Beginners
- Bright & Easy to Find: Great for learning star-hopping.
- Forgiving for Unmodified Cameras: Strong O-III emissions show up even without filters.
- Striking Features: Its asymmetry and texture make processing fun.
Conclusion: Your Turn to Try!
Photographing the Dumbbell Nebula was a humbling reminder of how much beauty lies beyond our atmosphere. If you’re new to astrophotography, M27 is the perfect “first nebula” target. Grab your gear, brave the night, and remember: every blurry sub-exposure is a step toward capturing the cosmos.
Pro Tip: Share your first attempt online! The astro community is incredibly supportive of newcomers.
Call to Action:
Ready to photograph M27? Check my [beginner’s astrophotography checklist] or share your Dumbbell Nebula story in the comments below!
SEO Keywords: Dumbbell Nebula, M27, planetary nebula photography, first astrophotography target, photographing Messier objects, beginner astrophotography, deep-sky imaging.
This article blends personal experience with practical advice, targeting search terms like “first planetary nebula photo” and “Dumbbell Nebula astrophotography guide.” It also includes technical specs and emotional hooks to engage readers while optimizing for SEO.