Kids activity shows finding fun in the simple things
Floating Marker Drawings: A Captivating Guide to Creating Mesmerizing Art
Meta Description: Discover the magic of floating marker drawings! Learn what they are, how to make them, and creative ideas for transforming ink and water into stunning artwork.
What Are Floating Marker Drawings?
Floating marker drawings (also known as “waterborne ink art” or “float art”) are a unique technique where permanent markers are used to create vibrant designs that appear to “float” on water. The ink is transferred onto paper or other surfaces from the water’s surface, resulting in abstract patterns, ethereal swirls, or precise illustrations with a dreamy, fluid aesthetic. This technique blends science and creativity, making it popular among artists, educators, and craft enthusiasts.
Why Try Floating Marker Art?
- Easy & Accessible: Requires minimal supplies—perfect for beginners or kids.
- Therapeutic Process: The flowing ink promotes mindfulness and experimentation.
- Stunning Results: Each piece is one-of-a-kind, with unpredictable, organic textures.
- Versatile Applications: Use it for greeting cards, wall art, journaling, or even fabric prints!
Materials You’ll Need
- Permanent Markers: Sharpie®, Posca, or alcohol-based markers work best.
- Shallow Tray: A glass dish, plastic container, or baking pan for water.
- Water: Room temperature or slightly warm.
- Paper: Smooth paper (e.g., cardstock, watercolor paper).
- Optional Add-Ons: Rubbing alcohol, toothpicks, straws, or sponges for added effects.
Step-by-Step Guide to Floating Marker Drawings
Step 1: Prepare Your Workspace
Cover your work area with newspaper or plastic. Fill your tray with 1–2 inches of water.
Step 2: Draw on the Water’s Surface
Color directly onto the water with your markers. Layer colors to create swirls or dots. Pro tip: Combine colors that blend well (e.g., blues and greens or pinks and oranges).
Step 3: Manipulate the Design (Optional)
Use a toothpick to swirl the ink or blow gently through a straw for marbled effects.
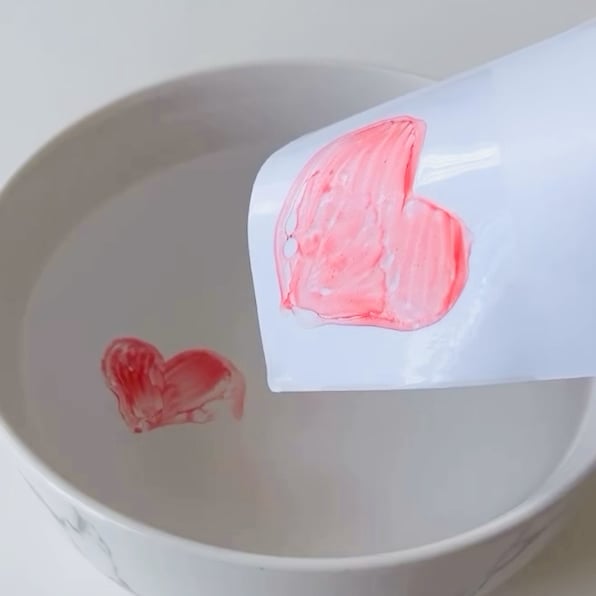
Step 4: Transfer the Ink to Paper
Carefully place a sheet of paper on the water’s surface. Press lightly, then lift it to reveal your floating masterpiece.
Step 5: Dry and Preserve
Let your artwork dry flat. Seal it with clear acrylic spray for longevity.
Creative Ideas to Level Up Your Art
- Geode-Inspired Pieces: Use concentric circles of metallic markers for crystal-like effects.
- Shadow Art: Layer floating designs over bold backgrounds.
- Mixed Media: Add glitter, watercolor, or collage elements after drying.
- Custom Stationery: Create floating marker gift tags or envelopes.
Troubleshooting Common Issues
- Ink Sinking? Use fresh markers with plenty of ink.
- Muddy Colors? Limit your palette to 2–3 hues and avoid over-mixing.
- Ink Not Sticking to Paper? Ensure you’re using non-coated paper and pressing evenly.
Safety & Eco-Friendly Tips
- Work in a ventilated area when using alcohol-based markers.
- Reuse water for multiple prints (just skim excess ink between sessions).
- Recycle dried-out markers through manufacturer programs.
FAQs About Floating Marker Art
Q: Can regular washable markers work?
A: No—only permanent or alcohol-based markers float properly.
Q: How long do floating marker drawings last?
A: If sealed, they can last years. Display them away from direct sunlight to prevent fading.
Q: Can I use other liquids besides water?
A: Yes! Try milk or shaving cream for different textures.
Conclusion: Unleash Your Creativity
Floating marker drawings turn simple supplies into extraordinary art. Whether you’re a teacher looking for a fun classroom project or an artist seeking inspiration, this technique offers endless possibilities. Grab your markers, embrace the flow, and let the water guide your masterpiece!
Call to Action
Ready to dive in? Share your floating marker creations with #FloatingInkArt on social media—we’d love to see your designs!
Target Keywords: floating marker drawings, float art tutorial, DIY floating ink art, water-based marker art, alcohol ink floating technique.
Optimization Tips:
- Use keywords naturally in headers and body text.
- Link to related content (e.g., alcohol ink projects, kids’ crafts).
- Add high-quality images of floating marker art to boost engagement.
By combining clear instructions with creative ideas, this article aims to rank for niche art techniques while inspiring readers to explore this magical medium!