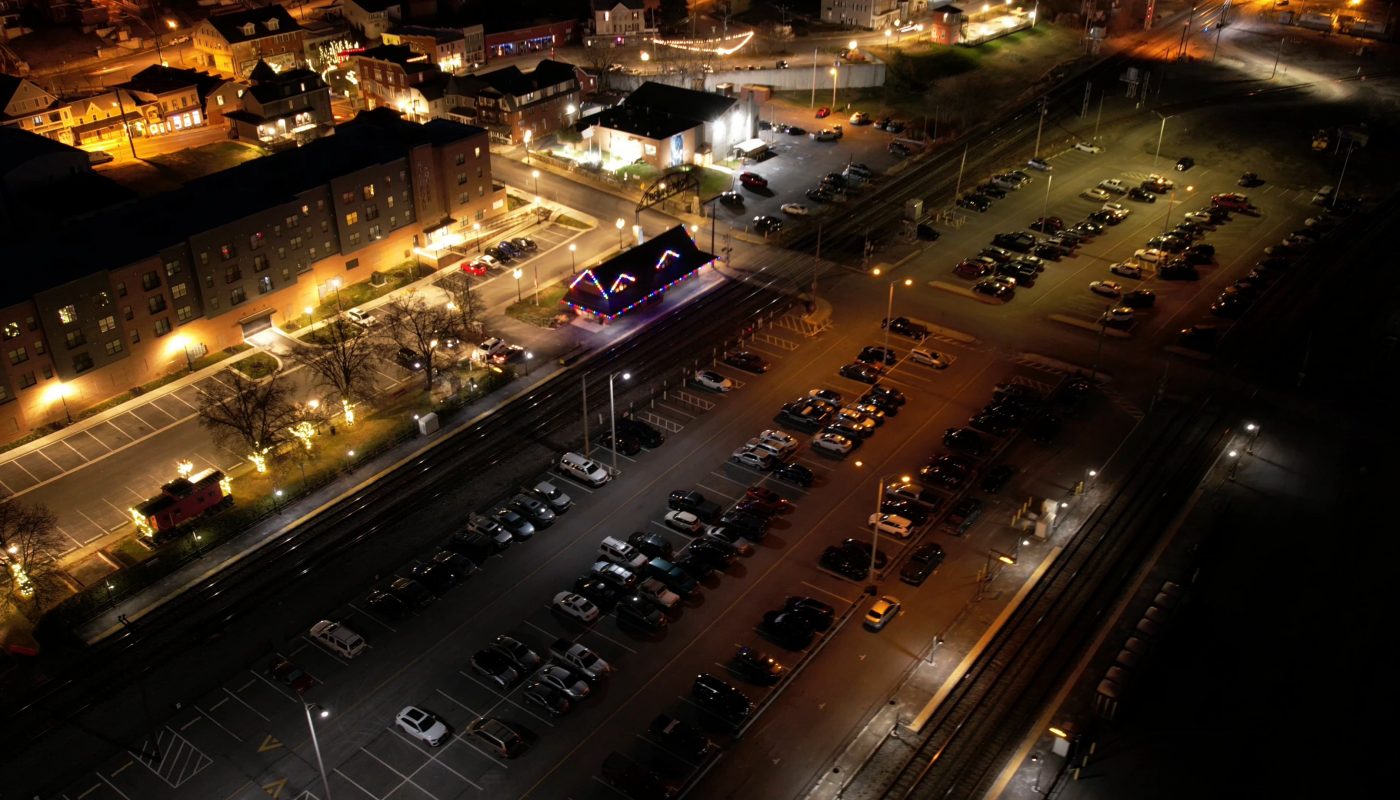
I made this with my DJI Air 2S in Brunswick, MD.
Capturing the Night: The Mesmerizing Art of a Train Station Hyperlapse After Dark
There’s something undeniably magnetic about train stations at night. Neon lights blaze against shadowy architecture, streaks of moving trains blur into ribbons of color, and solitary travelers drift through pools of artificial illumination like characters in a film noir. Capturing this dynamic energy—especially with hyperlapse photography—takes the scene from captivating to utterly hypnotic. If you’ve ever wondered how to create (or simply appreciate) a hyperlapse video of a train station after dark, this guide explores the technique, gear, and creative vision behind turning ordinary motion into extraordinary art.
What is Hyperlapse Photography?
Hyperlapse is a time-lapse technique that combines movement across space with the compression of time. Unlike a traditional static time-lapse (where the camera stays fixed), hyperlapse involves physically moving the camera between each shot over long distances—resulting in a fluid, cinematic “glide” effect. When applied to a bustling train station at night, the effect transforms everyday motion into a surreal, dreamlike dance of light and shadow.
Why Train Stations at Night Make Perfect Hyperlapse Subjects
-
Dynamic Lighting Contrasts
Nighttime stations juxtapose harsh artificial lights (streetlamps, signage, train headlights) with deep shadows and reflections, creating dramatic visuals perfect for time compression. -
Theatrical Movement
Trains arriving and departing, commuters weaving through crowds, and flickering digital boards inject rhythmic motion into every frame. -
Urban Aesthetic
Stations embody the pulse of a city—their architectural scale and grit feel both timeless and modern under night skies.
Planning Your Nighttime Train Station Hyperlapse
1. Scout Your Location
Visit the station beforehand to note:
- Safety & Access: Ensure you can move freely without disrupting operations.
- Key Visual Elements: Platforms with long sightlines, escalators, departure boards, and tunnels.
- Light Sources: Identify how lights interact (e.g., warm vs. cool tones, reflections on wet surfaces).
2. Time Your Shoot
- Blue Hour: The 20–30 minutes after sunset offers rich indigo skies that contrast beautifully with electric lights.
- Peak vs. Off-Peak: Crowded platforms create energy, while empty spaces evoke solitude.
3. Gear Essentials
- Camera: A DSLR or mirrorless camera with manual controls (to lock exposure and avoid flicker).
- Sturdy Tripod: Essential for stability during long exposures.
- Intervalometer: For automated shot sequencing (built-in or external).
- Wide-Angle Lens (10–24mm): Captures expansive scenes and exaggerates motion.
- Neutral Density (ND) Filter: Reduces light intake for longer exposures in bright urban settings.
Hyperlapse Technique: Shooting Step-by-Step
-
Set Up Your Base Shot
Begin with a stable composition, focusing on elements like tracks receding into darkness or a glowing departure board. -
Manual Settings for Consistency
- Aperture: f/8–f/16 for deep depth-of-field.
- Shutter Speed: 1–2 seconds to blur moving trains/people (adjust based on light).
- ISO: Keep as low as possible (ISO 100–400) to minimize noise.
-
Movement Strategy
- Mark Your Path: Use floor tiles or landmarks to measure consistent movements (e.g., 1 step per shot).
- Slow & Steady: Move the tripod incrementally between shots to ensure smooth motion in post.
-
Interval Timing
For hyperlapse, 3–5 seconds between shots balances fluidity with manageable editing.
Post-Processing Magic
-
Editing Software
Import images into Adobe Lightroom for batch color correction, then compile in Premiere Pro or After Effects. -
Stabilization
Use Warp Stabilizer (Premiere Pro) or dedicated plugins like ReelSteady to smooth any leftover camera shake. -
Enhancing Atmosphere
- Boost contrasts to make neon signs pop.
- Add slight vignetting to draw focus to the center.
- Adjust white balance to emphasize cool blues or warm golds.
-
Sound Design
Layer ambient station sounds (announcements, train brakes) or a synth-heavy score for cinematic impact.
Creative Inspirations for Your Hyperlapse
- The “Ghost Train” Effect: Long exposures turn moving trains into luminous streaks.
- Reverse Hyperlapse: Play your sequence backward for a quirky, otherworldly vibe.
- People as Shadows: Freeze commuters in motion with deliberate blurring, turning them into abstract shapes.
Final Thoughts: Why This Project Matters
A hyperlapse of a train station at night is more than just a technical exercise—it’s a love letter to urban life. It reveals hidden patterns in chaos, celebrates the beauty of mundane routines, and transforms transit hubs into stages for visual storytelling. Whether you’re a filmmaker, photographer, or digital artist, mastering this technique unlocks new ways to see—and share—the world after dark.
Ready to create your own? Grab your camera, embrace the night, and let the station’s pulse guide your lens. The rails are waiting. 🚆✨