Source Jason Welliver
The Ultimate Guide to Applying Masking Tape on a Basketball Court: Tips for Precision & Safety
Temporary court markings, practice drills, or quick boundary adjustments—masking tape is a versatile, budget-friendly solution for modifying basketball courts without permanent changes. Whether you’re a coach, facility manager, or DIY sports enthusiast, this guide walks you through how to apply masking tape on a basketball court properly, ensuring clean lines, safety, and easy removal.
Why Use Masking Tape on a Basketball Court?
Masking tape is ideal for temporary setups because it:
- Creates customizable lines for drills, small-sided games, or youth courts.
- Preserves flooring by sticking firmly yet removing cleanly (unlike duct tape).
- Costs pennies per foot compared to paint or vinyl decals.
- Works on most surfaces: hardwood, concrete, asphalt, or synthetic tiles.
What You’ll Need
Gather these supplies before starting:
- High-quality masking tape (1.5–2 inches wide; choose “painter’s tape” for delicate floors).
- Measuring tape (50–100 ft length).
- Chalk or a erasable marker for reference points.
- A straightedge (e.g., a ruler, level, or string line).
- Court dimension diagrams (for accuracy).
- Rubbing alcohol & cloth (to clean dusty/oily surfaces).
Step-by-Step Application Guide
1️⃣ Prepare the Court Surface
- Sweep the area thoroughly to remove dust, dirt, or debris.
- Wipe with rubbing alcohol if the floor is slick or greasy—this helps tape adhere better.
- Plan your layout: Sketch lines using chalk or a court diagram. Mark key points (e.g., three-point arc, key boundaries).
2️⃣ Measure & Mark Reference Points
- Use measuring tape to mark corners, arcs, and midpoints. For curved lines (like the three-point line):
- Tie a string to a pivot point (e.g., the center of the hoop).
- Measure the required radius (e.g., 19.75 ft for high school arcs), then mark the curve with chalk.
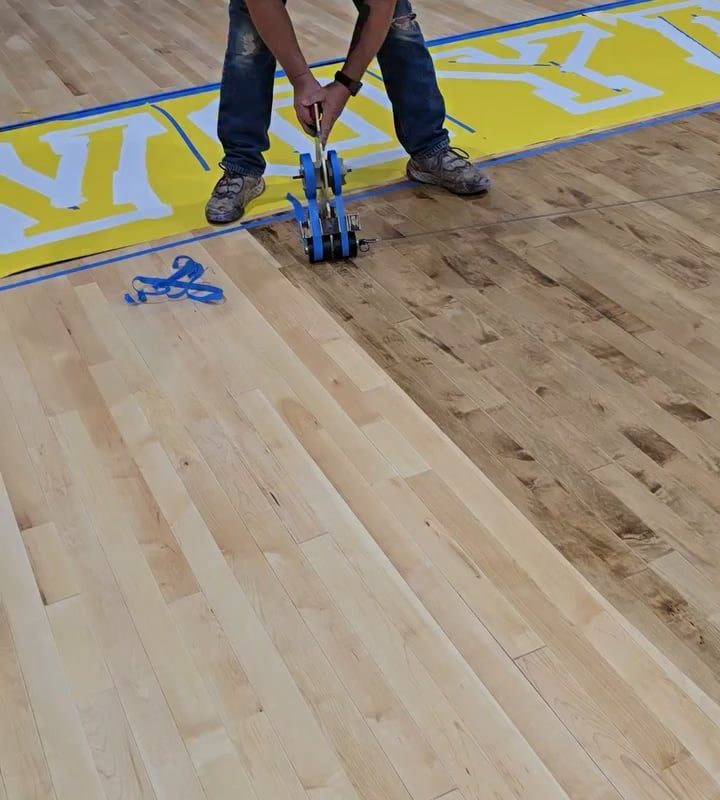
3️⃣ Apply the Tape
- Start with straight lines (sidelines, baselines, keys):
- Align one end of the tape with your chalk mark.
- Slowly unroll the tape while pressing it down firmly.
- Use a straightedge or string as a guide for precision.
- For curves: Apply shorter tape strips, slightly overlapping them while following your chalk outline.
- Avoid bubbles/wrinkles: Smooth tape as you go with your hand or a squeegee.
4️⃣ Reinforce High-Traffic Areas
- Double-layer tape over spots players frequently pivot on (e.g., free-throw line).
- Trim excess tape with scissors for a crisp finish.
Best Practices for Long-Lasting Results
✅ Use Wide Tape (2”+): Reduces lifting edges and withstands sneaker friction.
✅ Work in Sections: Apply tape in 3–4 ft segments to maintain control and straightness.
✅ Test Adhesion First: Apply a small strip, then peel it off to ensure no residue remains.
✅ Label Zones: Write on the tape (e.g., “Drill Zone” or “Out of Bounds”) with a marker.
Safe & Easy Tape Removal
- Peel slowly at a 45-degree angle to avoid tearing.
- Use a plastic scraper gently for stubborn residue (never metal tools!).
- Clean residue with a mild adhesive remover or rubbing alcohol if needed.
- Never leave tape on long-term: Prolonged exposure to heat/moisture can weaken adhesion and leave gunk.
Bonus: Creative Uses for Court Masking Tape
- Skill drills: Mark dribbling lanes, cone-free obstacle courses, or shooting boxes.
- Multi-sport lines: Overlay volleyball or pickleball boundaries for hybrid courts.
- Player safety: Highlight wet spots, cracks, or uneven surfaces during rainy games.
Alternative Temporary Marking Options
- Painter’s Tape: Less sticky than masking tape—ideal for polished wood floors.
- Gaffer Tape: Stronger hold for outdoor courts but pricier.
- Chalk or Cones: Quick-but-fuzzy lines for informal practice (no adhesion needed).
Final Tips for Success
- Check league regulations before modifying tournament courts.
- Avoid slippery tape: Glossy or heavily textured tape can become hazardous when sweaty.
- Inspect after games: Reapply loose sections as needed.
Conclusion
Applying masking tape to a basketball court is a simple way to customize your space for training, events, or multi-use facilities. By choosing the right tape, prepping the surface, and following precise application techniques, you’ll create professional-looking temporary lines that endure gameplay and peel off effortlessly. Whether you’re adjusting for a kids’ clinic or experimenting with new drills, masking tape unlocks limitless flexibility—without the commitment of paint!
FAQs
Will masking tape damage my court?
Not if removed promptly. High-quality tape rarely leaves residue on clean, dry floors.
How long can masking tape stay on a court?
Up to 3–5 days, depending on foot traffic and humidity. Remove sooner for polished floors.
Can I use masking tape outdoors?
Yes, but choose UV-resistant tape and apply only in dry conditions.
Is painter’s tape or masking tape better?
Painter’s tape is gentler on sensitive floors; masking tape offers stronger adhesion for rough surfaces.
Pro Tip: Store tape in a cool, dry place—heat and humidity weaken its adhesive over time!