Shoutout to monika_kowalska_art on instagram as she made this video and this artwork!
For anyone that's interested you can see more stuff like this on instagram.
https://www.instagram.com/monika_kowalska_art?igsh=MW42eHZpZGdjM3hhdQ==
Since many people have been asking, you can see the final product here:
https://www.instagram.com/reel/DSAl6bREXBj/?igsh=MXdkb3NzbnF6OHFxZQ==
Carving Out a Block Print: A Step-by-Step Guide to Traditional Printmaking Mastery
Block printing is a timeless art form that transforms simple materials into breathtaking designs. From intricate textile patterns to bold artistic statements, carving a block print unlocks endless creative possibilities. Whether you’re a curious beginner or a seasoned crafter, this guide will walk you through the process of carving a block print, including tools, techniques, and pro tips for success.
What is Block Printing?
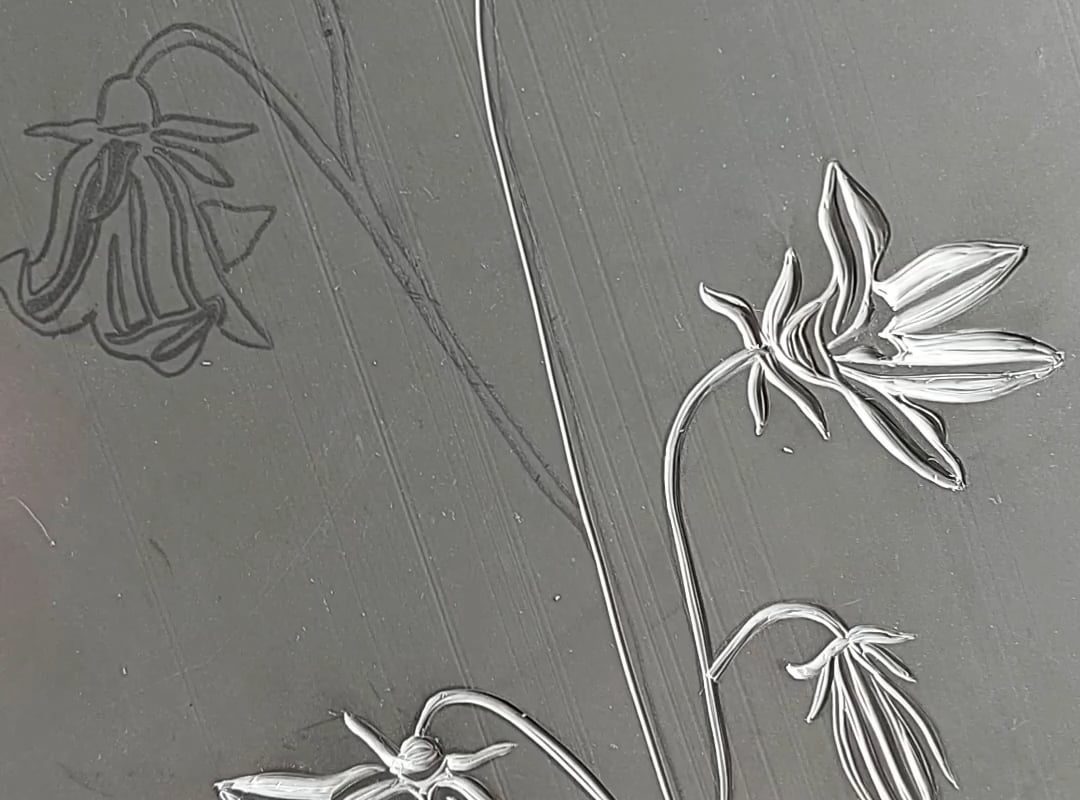
Block printing is a relief printing technique where a design is carved into a flat surface (like wood or linoleum). Ink is applied to the raised areas, which are then pressed onto paper, fabric, or other materials to create a print. This method has been used for centuries in cultures worldwide, from Japanese ukiyo-e to Indian textiles.
Key Tools & Materials You’ll Need
- Carving Block:
- Linoleum: Soft, easy to carve, ideal for beginners.
- Wood (birch, maple): Durable but requires sharper tools.
- Rubber Blocks: Flexible and forgiving for detailed work.
- Carving Tools:
- Gouges & Linocut Cutters: V-shaped (for lines), U-shaped (for clearing), and fine-tipped blades.
- Bench Hook: Secures your block while carving.
- Design Supplies:
- Pencil, tracing paper, or carbon paper.
- Permanent marker to outline your design.
- Safety Gear:
- Cut-resistant gloves, especially when using sharp tools.
Step-by-Step: How to Carve a Block Print
1. Design Your Pattern
- Keep it simple: For your first project, opt for bold shapes and minimal detail.
- Flip it!: Remember, your carved design will print in reverse. Trace your final sketch backward or digitally mirror it.
- Transfer the Design: Use carbon paper or shade the back of your sketch with pencil, then trace onto the block.
2. Secure the Block
- Place the block on a non-slip surface or clamp it with a bench hook.
- Pro Tip: Wear a cut-resistant glove on your non-dominant hand to avoid slips.
3. Start Carving
- Outline First: Use the smallest V-gouge to trace your design’s edges.
- Carve Away Negative Space: Switch to a U-gouge or wider blade to remove material around your design. Keep movements controlled and shallow—deep gouges can weaken the block.
- Work from Center Outward: Reduces the risk of accidentally cutting into key areas.
- Test as You Go: Roll a bit of ink or dab with marker to check if unwanted areas need more carving.
4. Refine Details
- Use fine blades to add texture, crosshatching, or intricate elements.
- Clean debris with a soft brush (not your hands—oil can affect ink adherence).
Common Mistakes to Avoid
- Over-Carving: Removing too much material can collapse delicate sections.
- Ignoring Grain Direction: For wood blocks, carve with the grain to prevent splintering.
- Rushing the Design: Imperfections in the sketch will magnify in the final print.
Pro Tips for Flawless Carving
- Warm Your Block: Slightly heating linoleum with a hairdryer softens it, making carving smoother.
- Angle Your Tool: Hold gouges at 30–45 degrees for cleaner cuts.
- Practice on Scraps: Test tools and pressure on spare material first.
What’s Next? Printing Your Masterpiece!
Once your block is carved, you’re ready to ink and print! Use a brayer to evenly apply block-printing ink, press firmly onto your surface (paper, fabric, etc.), and reveal your hand-carved creation.
Why Try Block Printing?
- Mindful Creativity: Carving is meditative and rewarding.
- Eco-Friendly Art: Reuse blocks or recycle materials like erasers for small stamps.
- Unique Results: No two prints are perfectly identical—embrace the handmade charm!
Final Thoughts
Carving a block print connects you to centuries of artistic tradition while letting your imagination run wild. Start with small projects, embrace imperfections, and soon you’ll be crafting prints worthy of framing, gifting, or even selling. Happy carving!
Keywords for SEO:
Block printing tutorial, carve linocut, relief printing techniques, beginner block carving, DIY printmaking, hand-carved stamps, block print art, traditional printing methods.
Meta Description:
Learn how to carve a block print step-by-step! This guide covers tools, techniques, and tips for beginners to master the ancient art of relief printmaking.