Creating wooden spheres on a lathe
Creating Perfect Wooden Spheres on a Lathe: A Step-by-Step Guide
Wooden spheres are versatile projects, perfect for crafting everything from drawer knobs and furniture accents to decorative bowls or game pieces. Turning a flawless sphere on a lathe requires patience, precision, and the right techniques. In this guide, we’ll walk you through the process, tools needed, and tips to master the art of spherical woodturning.
Why Turn Wooden Spheres?
Wooden spheres blend functionality and artistry. They’re used in:
- Home décor (vase fillers, table legs)
- Crafting (toys, ornaments, jewelry)
- Furniture (knobs, feet, pulls)
- Artistic projects (sculptures, installations).
Turning spheres also hones fundamental lathe skills like symmetry, tool control, and sanding.
Tools & Materials You’ll Need
Essential Tools:
- Wood lathe (with variable speed control).
- Lathe chisels: Roughing gouge, spindle gouge, skew chisel, and parting tool.
- Callipers or sphere-sizing tools (to measure diameter).
- Faceplate or chuck (for securing the blank).
- Safety gear: Face shield, dust mask, hearing protection.
Materials:
- Hardwood blanks (Maple, Walnut, Cherry, or Birch work best—avoid softwoods like pine).
- Sandpaper (80- to 600-grit).
- Wood finish (oil, wax, or lacquer).
Step-by-Step: Turning a Wooden Sphere
1. Prepare the Blank
- Start with a square or rectangular blank. Aim for a size slightly larger than your desired sphere (e.g., 3″ cube for a 2.5″ sphere).
- Mount the blank securely between centers or on a faceplate/chuck. Ensure it’s tightly fixed to prevent wobbling.
2. Rough Out the Shape
- Set lathe speed: Start slow (800-1,200 RPM) for safety.
- Round the blank: Use a roughing gouge to turn the blank into a cylinder.
- Mark the center: Draw a line around the cylinder’s midpoint—this will be your sphere’s equator.
3. Shape the Hemisphere
- Taper the ends: Starting from the equator, angle your spindle gouge toward one end to create a gentle curve. Work symmetrically on both sides.
- Refine the shape: Switch to a skew chisel for smoother cuts. Rotate the lathe by hand frequently to check symmetry.
💡 Pro Tip: Use callipers to measure the diameter at multiple points. Adjust cuts to ensure uniformity.
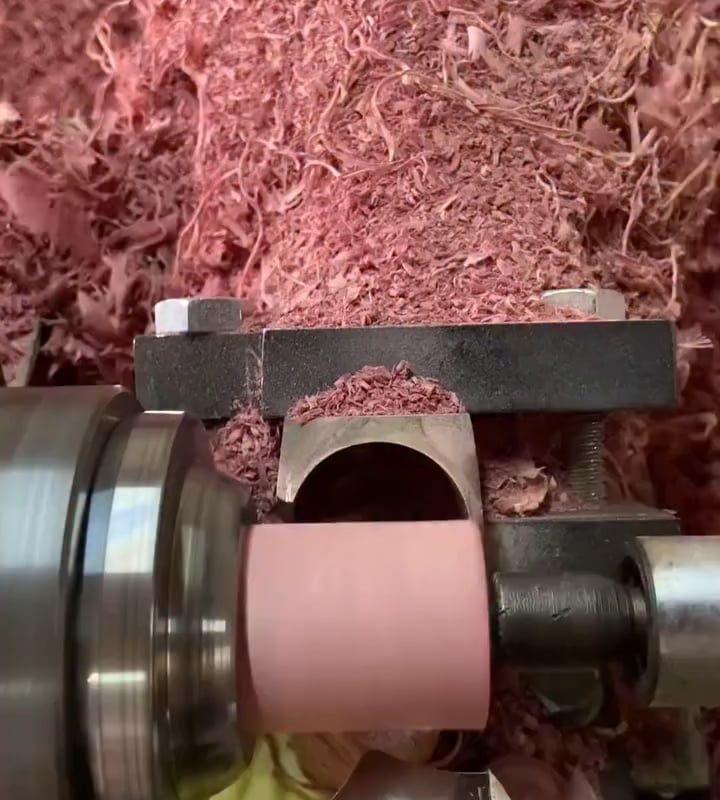
4. Part Off the Sphere
- Create tenons: Leave small tenons (nubs) on both ends of the sphere using a parting tool. These will hold the sphere in place for finishing.
- Sand while mounted: Start sanding with 80-grit paper, progressing to 220-grit to smooth the surface.
5. Reverse Mount for Finishing
- Remove one tenon: Carefully part off one tenon, leaving a small stub.
- Remount the sphere: Use a jam chuck (custom-made holder) or a cole jaw chuck to secure the sphere by the remaining tenon. This exposes the previously hidden area for final sanding and finishing.
- Sand and finish: Sand up to 600-grit, apply your chosen finish (e.g., mineral oil or beeswax), and buff.
Safety Tips for Lathe Sphere Turning
- Always wear a face shield: Wood fragments can fly at high speeds.
- Secure the blank tightly: Loose wood can become a dangerous projectile.
- Keep tools sharp: Dull tools cause tear-out and require more force, increasing slippage risk.
- Avoid loose clothing or jewelry: These can get caught in the lathe.
Advanced Techniques
- Multi-Axis Turning: Create intricate designs by remounting the sphere at angles.
- Segmented Spheres: Glue contrasting wood pieces into a blank for patterned spheres.
- Inlay Work: Add metal or resin details after turning.
Troubleshooting Common Issues
- Uneven Shape: Frequently measure with callipers and adjust cuts.
- Tear-Out: Sharpen tools, reduce feed speed, or dampen wood with water to raise fibers.
- Sanding Marks: Progress through grits slowly and sand cross-grain lightly at higher grits.
Conclusion
Turning wooden spheres on a lathe is an exercise in patience and precision, but the results are incredibly rewarding. Start with simple hardwood blanks, master the fundamentals of shaping and sanding, and soon you’ll create flawless orbs for any project.
Practice makes perfect—experiment with sizes, woods, and finishes to discover your signature style. Happy turning!
FAQs
Q: Can I make spheres without a lathe?
A: Yes, but it’s labor-intensive. Use a bandsaw to rough out a sphere, then sand manually.
Q: What’s the best wood for beginners?
A: Maple or cherry—they’re dense, affordable, and turn smoothly.
Q: How do I prevent burning during sanding?
A: Use light pressure and keep the paper moving. Lower lathe speed for fine sanding.
Q: Should I dry wood before turning?
A: Absolutely! Kiln-dried or properly air-dried wood minimizes cracking and warping.
Optimize your shop’s workflow with this guide, and share your spherical creations with #WoodturningSpheres!