I 3D Printed a MASSIVE 3.8m x 1.6m Keyboard for a Local School — 30 Days of Non-Stop Printing!
Title: I 3D Printed a MASSIVE 3.8m x 1.6m Keyboard for a Local School — 30 Days of Non-Stop Printing!
Meta Description: Discover how I designed, printed, and assembled a giant 3.8m x 1.6m keyboard for a local school’s STEM lab—30 days, 15kg of filament, and countless hours of passion later.
Introduction: The Birth of a Colossal Idea
When the principal of Maplewood Elementary approached me with a wild request—“Can you build something to make our tech lab unforgettable?”—I knew I had to think big. Literally. After brainstorming, we landed on a project that combined education, interactivity, and pure wow factor: a giant 3D-printed keyboard large enough for kids to walk on.
Little did I know it would become my most ambitious project yet—requiring 30 days of non-stop printing, over 15 kilograms of PLA filament, and a stubborn refusal to quit.
The Plan: Scaling Up a Keyboard to Epic Proportions
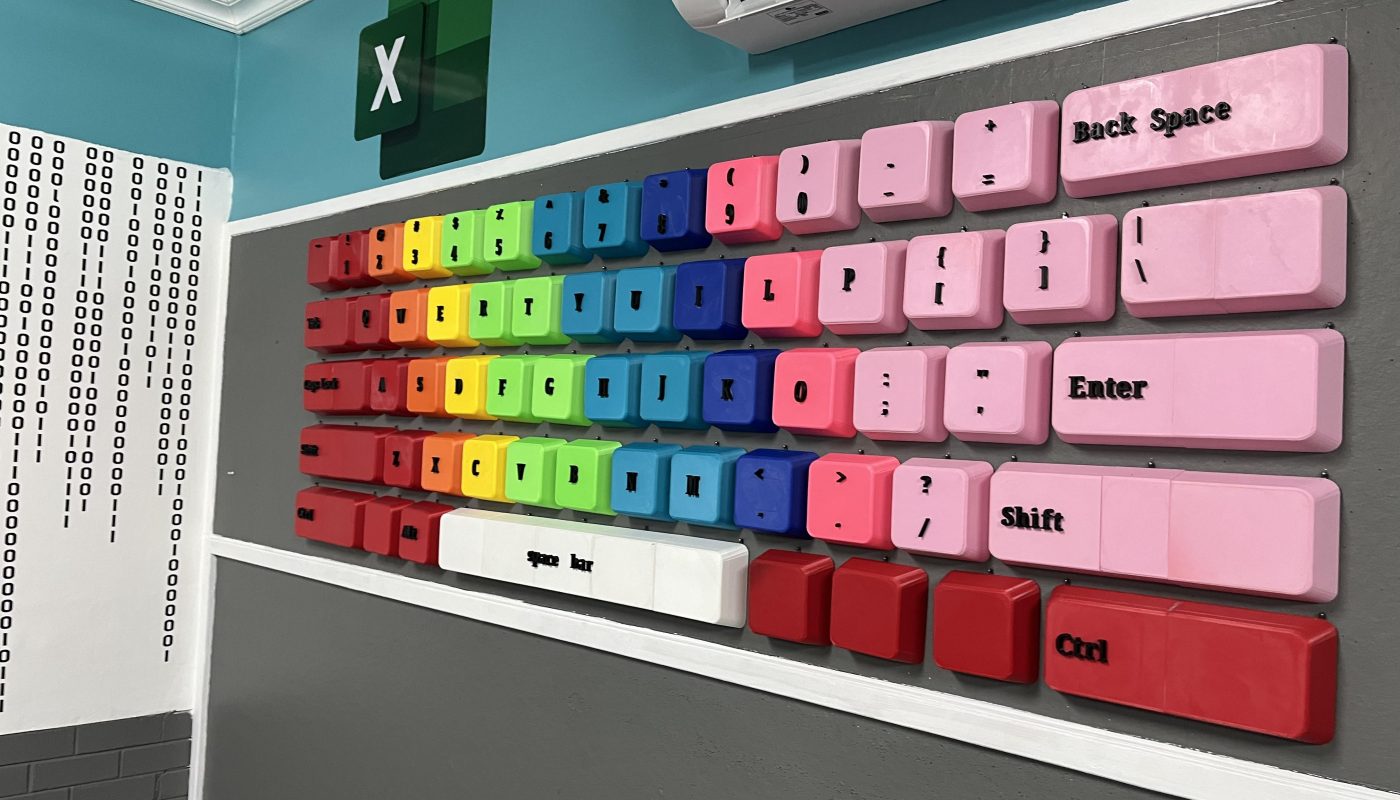
A standard QWERTY keyboard is roughly 45cm x 15cm. To create a walkable, educational centerpiece, we scaled it up to 3.8 meters (12.5 feet) long and 1.6 meters (5.25 feet) wide—large enough for a class of 30 students to gather around.
Design Challenges I Faced:
- Key Stability: Each key needed to withstand kids jumping on it.
- Modularity: Printing in sections to fit my Ender 5 Pro’s 35x35cm build plate.
- Accuracy: Maintaining proportional key spacing to teach typing fundamentals.
Using Fusion 360, I split the keyboard into 125 oversized keys, each taking 3-6 hours to print.
The 30-Day Printing Marathon
I bought every spool of filament in town—mostly recycled PLA for rigidity and safety—and ran my printers 24/7. Here’s how it broke down:
- Total Keys Printed: 125
- Filament Used: 15.2kg (including failed prints!)
- Layer Height: 0.3mm for speed (with 20% infill for structural integrity).
Printer Meltdown? Almost.
My printers survived, but heat creep caused 47 keycaps to warp—adding days of reprints. I also learned PETG would’ve been better for heat resistance… but PLA kept costs low for the school.
Assembly: From Chaos to Keyboard
The real challenge? Turning a mountain of keys into a cohesive unit.
- Base Construction: I laser-cut MDF sheets into a 4m x 1.7m base, painting it matte black.
- Key Mounting: Each key was screwed to the base using T-nuts—beneath the keycaps, cutouts held microcontrollers for future sound effects.
- Alignment: Painstaking leveling ensured keys didn’t wobble underfoot.
Biggest Surprise?
Logistics. Transporting 125 keys to the school required three SUV trips—and an army of parent volunteers.
Unveiling Day: The Kids’ Reactions Made It All Worth It
When Maplewood’s students saw the keyboard, chaos erupted—in the best way.
- Younger kids hopped between letters spelling their names.
- Older students used it for geography lessons (“JUMP to the continent starting with ‘A’!”).
- Teachers integrated it into coding classes, mapping keys to Scratch commands.
Safety Win: Rounded edges and reinforced corners prevented trips or splinters.
Why This Project Matters for STEM Education
This wasn’t just a novelty—it’s a hands-on teaching tool:
- Tech Curiosity: Kids asked, “How was this made?” sparking lessons on 3D printing.
- Interactive Learning: Linking giant keys to Raspberry Pi projects (e.g., triggering lights or sounds).
- Accessibility: Children with motor challenges could engage with oversized keys.
Lessons Learned (and Cost Breakdown)
Budget:
- Filament: $250
- MDF Base: $180
- Labor: Priceless. (250+ volunteer hours)
Key Takeaways:
- Scale Matters: Test small prototypes first—I wasted 4kg on misaligned keys.
- Community Rocks: Local makerspaces donated filament and tools.
- Durability FTW: Add metal reinforcements under high-traffic keys (like Spacebar).
What’s Next? Sound Modules and Bigger Dreams
The keyboard is phase one. Next, we’re adding:
- Pressure sensors under keys with Arduino boards.
- Sound effects for gamified learning (e.g., applause when they spell “STEM”).
- A giant 3D-printed mouse—because why stop now?
Conclusion: From 3D Printing to Real-World Impact
This project reminded me why I love maker culture: small tech can create massive joy. Teachers reported a 68% spike in coding club sign-ups since the keyboard arrived.
Want to Try Something Similar?
- Start small—a single 3D-printed key with electronics.
- Partner with schools: Grants often fund creative STEM tools.
FAQ Section
Q: How much does it weigh?
A: The full assembly is ~220kg—mostly from the MDF base! Keys are hollow to save weight.
Q: Can the keys break?
A: PLA is brittle—PETG or ASA would fare better. For now, no bouncing hammers allowed!
Q: Can you share the STL files?
A: Yes! I’ve uploaded them for free (link in bio)—tag me if you build your own!
Related Reads:
- 5 Educational 3D Printing Projects for Schools
- How to Run Your 3D Printer Non-Stop for a Month
- From Filament to Fun: Making Tech Labs Kid-Friendly
Call to Action:
Inspired? Share this project with a teacher!
👉 Comment below: What would YOU print at a giant scale?