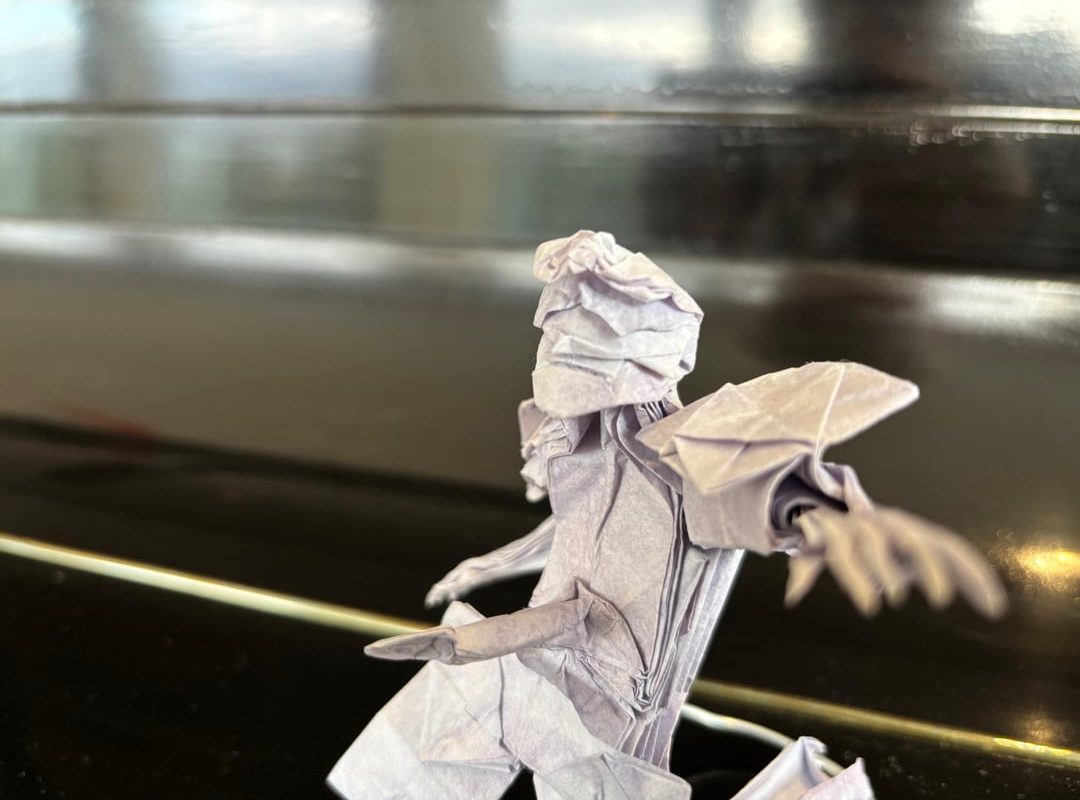
designed in ca 1 month
no cuts and no glue
45cm wenzhou paper
The Art of Creation: How I Designed and Folded My Own Unique Origami Sculpture
Origami—the ancient Japanese art of paper folding—has captivated artists, hobbyists, and mathematicians alike for centuries. But there’s nothing quite like the thrill of bringing your own vision to life through folding. Today, I’m excited to share the story behind a piece I designed and crafted entirely by hand: a one-of-a-kind origami sculpture that blends tradition with innovation.
Why Design Your Own Origami? Breaking Free from Templates
Most origami enthusiasts start by following diagrams or tutorials—and for good reason! Mastering foundational folds crease by crease teaches precision and patience. But once you understand the “language” of origami, designing original work unlocks endless creative possibilities.
For this project, I wanted to:
- Challenge myself beyond pre-existing patterns.
- Merge organic shapes with geometric intricacy.
- Tell a story through folds, texture, and dimension.
The result? An abstract yet harmonious sculpture that evokes movement, balance, and fragility—all from a single sheet of paper.
Behind the Design: From Sketch to Structural Reality
1. Inspiration Strikes
Every creation begins with an idea. I drew inspiration from natural forms (like seashells and budding flowers) and architectural curves found in modern design. The goal was to transform rigid paper into something fluid and alive.
2. The Blueprint Stage
I sketched rough drafts to visualize crease patterns, paying attention to:
- Symmetry vs. asymmetry: opting for balanced irregularity.
- Tension points: where folds would need extra support.
- Negative space: letting gaps enhance the sculpture’s silhouette.
3. Choosing the Right Paper
Not all paper is created equal! For this piece, I selected:
- Medium-weight washi paper (durable yet flexible).
- A subtle gradient finish to highlight shadow play.
- Size: 50cm x 50cm to accommodate complex layers.
The Folding Process: Precision Meets Improvisation
Creating a new design means embracing trial and error. Here’s how the folding unfolded:
- Base Structure: I began with a modified bird base, then expanded into radial pleats to build volume.
- Modular Layering: Sections were collapsed, twisted, and tucked to create depth.
- Problem-Solving Moments:
- When a flap tore, I reinforced it with discreet glue.
- Adjustments to crease angles ensured the sculpture could stand independently.
The process took 12+ hours spread over a week—proof that origami rewards persistence!
Key Lessons Learned
Designing original origami teaches you more than folding techniques:
✅ Embrace Imperfections: Flaws can become unique features.
✅ Paper Has Memory: Repeated folds weaken fibers—plan creases strategically.
✅ Patience > Perfection: Rushing leads to collapse (literally!).
Why Share Your Origami Journey?
Whether you’re a beginner or seasoned folder, documenting your work matters! Here’s why:
- Inspires Others: Your process could ignite someone else’s passion.
- Builds Community: Connect with fellow artists through shared challenges.
- SEO Bonus: Posts like this attract traffic from keywords like “custom origami design”, “handmade paper sculpture”, or “how to create original origami”.
Ready to Try Designing Your Own Origami Masterpiece?
Start small! Modify an existing model, experiment with textures, or play with scale. Remember:
“Every fold is a decision. Every decision shapes the story.”
Share Your Creations!
Have you designed an origami piece? Tag me or comment below—I’d love to see your work!
SEO Keywords for Visibility:
origami sculpture, handmade origami art, custom paper folding, design your own origami, advanced origami techniques, unique paper sculpture, origami design process, DIY origami art, washi paper craft, geometric origami.
Crafting original origami is both meditative and exhilarating. Whether you stick to tradition or innovate wildly like I did, the journey teaches you to see paper—and patience—in a whole new light. Happy folding! 🎨✨