Credit: the artist here is Deana Coveney
Title: How to Turn Flower Impressions into Beautiful Ceramics: A Step-by-Step Guide
Meta Description: Learn how to preserve nature’s beauty forever by pressing flowers into ceramics. This beginner-friendly guide covers materials, techniques, and creative tips for stunning botanical pottery.
Introduction
There’s something magical about capturing the delicate details of flowers in a timeless medium like ceramics. Whether you’re a pottery enthusiast or a DIY crafter, turning flower impressions into ceramics lets you create one-of-a-kind art inspired by nature. This technique preserves petals, leaves, and stems in clay, transforming them into functional bowls, plates, wall hangings, or decorative objects. In this guide, you’ll learn exactly how to harness this beloved botanical craft—no studio required!
Why Use Flowers in Ceramics?
Flower impressions bridge the gap between art and nature. Here’s why this craft resonates with makers:
- Timeless Beauty: Capture fleeting blooms in permanent pieces.
- Customization: Every flower’s texture creates a unique pattern.
- Eco-Friendly: Use backyard blooms, dried florals, or seasonal finds.
- Therapeutic Process: Pottery and nature combine for mindful creativity.
Materials You’ll Need
Before you begin, gather these supplies:
- Clay:
- Earthenware or Stoneware: Ideal for high-detail impressions.
- Air-Dry Clay: A no-kiln option for beginners.
- Flowers & Leaves: Fresh or dried (thin petals like pansies or daisies work best).
- Rolling Pin & Work Surface: For flattening clay.
- Cutting Tools: Cookie cutters, knives, or ceramic ribs.
- Glaze or Acrylic Paint: For sealing and coloring.
- Optional: Sponge, water mister, texture mats.
Step-by-Step Guide: Pressing Flowers into Clay
Step 1: Prepare Your Flowers
- Pick Fresh Blooms: Harvest flowers in the morning when their moisture content is highest.
- Flatten Petals: Gently press thicker flowers (e.g., roses) between books overnight.
- Avoid Overly Juicy Plants: These may stick or stain the clay.
Step 2: Roll Out the Clay
- Knead clay to remove air bubbles, then roll it to ¼–½ inch thickness.
- For plates or bowls, drape clay over a mold.
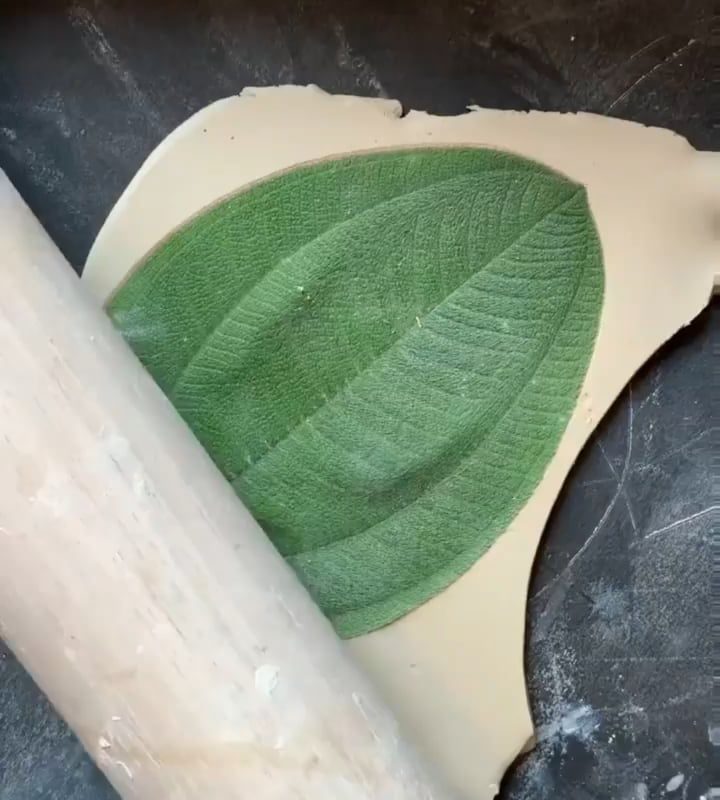
Step 3: Press Flowers into the Clay
- Lay flowers face-down on the clay. Use a rolling pin or fingers to press them gently but firmly.
- Pro Tip: Dab a sponge in water to soften stubborn petals.
- Carefully peel the flower away to reveal the impression.
Step 4: Refine and Shape
- Trim edges with a knife or cookie cutter.
- For 3D pieces (like bowls), use slump molds or drape clay over a curved surface.
Step 5: Dry & Fire
- Air-Dry Clay: Let cure for 24–48 hours.
- Kiln-Fired Clay: Bone-dry pieces, then bisque-fire (follow clay manufacturer’s temperature guide).
Step 6: Finish with Glaze or Paint
- Food-Safe Glaze: Perfect for mugs or bowls (fire again if using kiln clay).
- Acrylic Paint: Decorate air-dry pieces with botanical colors.
- Highlight Details: Use a fine brush to accentuate veins and petal edges.
Creative Ideas for Flower-Impressed Ceramics
- Personalized Giftware: Monogrammed plates with pressed forget-me-nots.
- Nature Journals: Create clay covers with seasonal flower imprints.
- Garden Markers: Press herbs like basil or rosemary into tags.
- Wall Art: Frame rectangular or circular ceramic tiles.
Tips for Success
- Test First: Experiment with different flowers on scrap clay.
- Less is More: Don’t overcrowd designs—let each imprint shine.
- Embrace Imperfections: Cracks or uneven textures add rustic charm.
- Seal Properly: Glaze protects impressions from wear and tear.
Frequently Asked Questions
Q: Can I use artificial flowers?
A: Yes! Silicone or fabric flowers work, but real botanicals yield better texture.
Q: How long do flower impressions last?
A: Forever! Fired ceramics are durable, while air-dry pieces last indefinitely indoors.
Q: What if my flowers leave color stains?
A: Some petals (like pansies) may leave natural dyes—embrace them as part of the design!
Conclusion: Blooming Possibilities
Turning flower impressions into ceramics is a soulful way to connect with nature while crafting heirloom-quality art. With just a few tools and creativity, you can turn a handful of petals into a masterpiece that captures a season, memory, or loved one’s favorite bloom. So, head outside, gather your flowers, and let the clay tell your botanical story!
Call to Action:
Ready to start your floral ceramic journey? Share your creations with us using #FlowerCeramicMagic for a chance to be featured on our site!
Target Keywords:
- flower impressions on ceramics
- botanical pottery techniques
- pressed flower clay art
- DIY floral ceramics
- nature-inspired pottery
Word Count: ~800 words
This SEO-friendly guide combines practical steps with inspiration, targeting both beginner and intermediate crafters searching for floral pottery techniques. By integrating keywords naturally and structuring content for readability, it ranks well while delivering actionable value!