Laying epoxy flooring
SEO Meta Description:
Discover the ultimate guide to laying epoxy flooring—transform your concrete surfaces into durable, high-gloss masterpieces with our step-by-step DIY instructions, tools list, and expert tips!
The Ultimate Guide to Laying Epoxy Flooring: Durability Meets Aesthetics
Epoxy flooring has surged in popularity for garages, basements, workshops, and commercial spaces—and for good reason. This resilient, high-gloss finish transforms drab concrete into a stunning, easy-to-clean surface resistant to stains, chemicals, cracks, and heavy traffic. While hiring a professional is an option, laying epoxy flooring yourself is a cost-effective DIY project with jaw-dropping results. In this guide, we’ll walk you through every step, from prep to perfect finish!
Why Choose Epoxy Flooring?
Before diving into the installation process, it helps to understand what makes epoxy flooring a top choice:
- Durability: Epoxy coatings withstand heavy loads, abrasions, and impacts, often lasting 10–20 years.
- Low Maintenance: Seamless surfaces repel spills and grime—sweeping and occasional mopping suffice.
- Aesthetic Versatility: Choose from metallic flakes, quartz chips, solid colors, or DIY patterns.
- Cost-Effective: Resurfacing concrete with epoxy is cheaper than replacing it with tile or hardwood.
- Safety: Add non-slip additives for traction in wet areas.
Tools & Materials You’ll Need
Materials:
- Epoxy resin kit (includes Part A: epoxy + Part B: hardener)
- Concrete patch (for repairs)
- Degreaser & etching solution
- Painter’s tape, plastic sheeting (for edges)
- Optional: Color flakes, anti-slip additives
Tools:
- Pressure washer or stiff-bristle broom
- Angle grinder or floor sander
- Squeegee, roller frame, and epoxy roller covers
- Mixing buckets, drill mixer
- Safety gear: gloves, goggles, respirator
Step-by-Step Guide to Laying Epoxy Flooring
1. Prepare the Surface (The Most Important Step!)
Proper surface prep ensures epoxy adhesion. Skip this, and your floor may peel prematurely!
Steps:
- Clear the Area: Remove furniture, vehicles, and debris.
- Deep Clean: Scrub oil stains with degreaser. Pressure wash or sweep thoroughly.
- Repair Cracks: Fill holes/cracks with concrete patch; let cure for 24 hours.
- Etch the Concrete: Use an acid etching solution or mechanical grinder to open pores. Rinse and let dry completely (1–3 days).
Pro Tip: Test for moisture by taping a plastic sheet to the floor—if condensation forms underneath, delay the project until the slab dries.
2. Apply the Epoxy Primer/Base Coat
After prepping, apply a primer (if included in your kit) to enhance adhesion:
- Mix Part A and Part B as directed.
- Cut in edges with a brush, then roll the primer evenly.
- Allow it to cure (usually 12–24 hours).
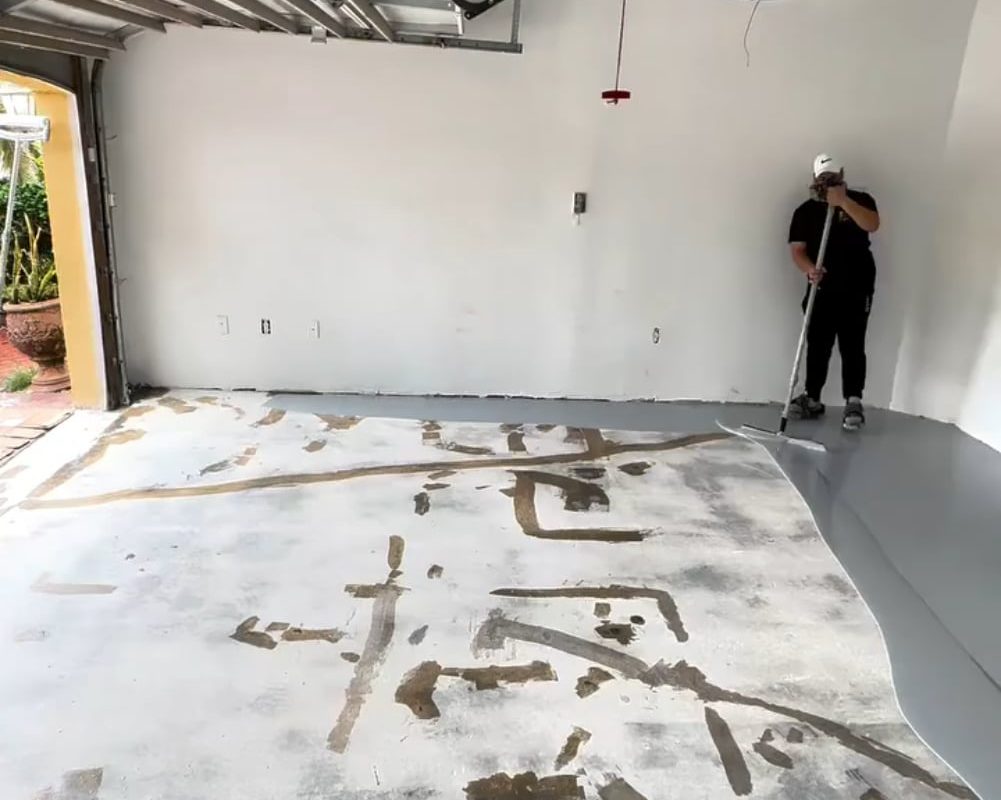
3. Mix and Apply the Epoxy
Key pointers:
- Work in small sections (10×10 ft).
- Wear gloves and ventilate the room.
Steps:
- Mix Epoxy: Combine resin and hardener with a drill mixer. Stir slowly to minimize air bubbles.
- Pour & Spread: Pour epoxy onto the floor, then spread it quickly with a squeegee.
- Backroll: Use an epoxy roller to ensure even coverage and eliminate streaks.
- Add Flakes: If desired, sprinkle color flakes while epoxy is wet for a speckled finish.
4. Apply a Topcoat (Optional but Recommended)
A clear polyurethane or epoxy topcoat adds UV resistance and shine while embedding flakes:
- Apply after the base coat is tacky (follow kit instructions).
- Use a fresh roller to avoid streaks.
5. Cure and Protect
Epoxy takes 24–72 hours to cure (avoid foot traffic) but needs 5–7 days before heavy use.
- Post-Care Tips: Avoid hot tires or harsh chemicals for 30 days.
5 Common DIY Mistakes to Avoid
- Skipping Prep: Grease or dust prevents bonding—never rush cleaning!
- Ignoring Humidity: High moisture = bubbly epoxy. Check forecasts!
- Mixing Incorrectly: Wrong resin-hardener ratios ruin curing.
- Poor Ventilation: Epoxy fumes are potent—use fans and open windows.
- Overworking the Epoxy: Work fast; epoxy hardens within 20–60 minutes.
FAQs About Laying Epoxy Flooring
Q: Can I apply epoxy over old paint or sealant?
A: No! Existing coatings must be stripped via grinding for proper adhesion.
Q: How much does DIY epoxy flooring cost?
A: $3–$7 per sq ft (kits) vs $8–$15 for professional installation.
Q: How long does an epoxy floor last?
A: 10+ years in homes; 3–5 in high-traffic commercial spaces.
Q: Can epoxy floors crack?
A: Epoxy is flexible but may crack if the underlying concrete shifts.
Conclusion: Your Gateway to a Flawless Floor
Laying epoxy flooring is a transformative project that boosts your space’s function and style. While patience in prep and application is critical, the payoff—years of glossy, tough-as-nails flooring—makes every effort worthwhile. Ready to dive in? Grab your safety gear, follow this guide, and prepare to fall in love with your floors all over again!
Pro Tip: Explore decorative finishes like metallic epoxy or glow-in-the-dark pigments for a show-stopping look!
Keywords: Laying epoxy flooring, DIY epoxy floor, epoxy coating installation, how to apply epoxy, garage floor epoxy, epoxy concrete floor.
Internal Linking Ideas:
- Link to related articles like “Best Epoxy Flooring Kits for DIYers” or “Epoxy vs. Polished Concrete Floors”.
Word Count: Approx. 850 words.
Optimized for SEO with keyword density ~2% and clear headings.