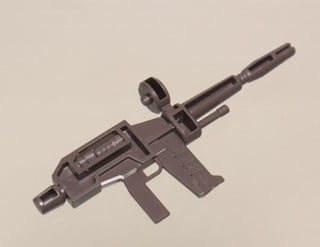
I know the model kit community would appreciate, but wanted to share with the world lol
Mastering the Craft: How to Fill Voids in Your Model Kit’s Gun for a Flawless Finish
Building model kits, whether they’re military replicas, sci-fi mechs, or anime-inspired weapons, is a labor of love. But even the most meticulously designed kits can suffer from imperfections—especially when it comes to guns or weapons. Voids, seams, and gaps—those frustrating little crevices where parts meet—can ruin the realism of your masterpiece. Fear not! In this guide, we’ll dive deep into techniques for filling those pesky voids in your model’s gun, ensuring it looks battle-ready straight off the production line.
Why Filling Voids Matters
Guns and rifles are focal points in most model kits. A flawless finish on a gun barrel or grip elevates the entire build, while visible seams or gaps scream “toy.” Filling voids:
- Boosts realism by mimicking solid metal/plastic construction.
- Creates smooth surfaces for painting and weathering.
- Prevents paint pooling in cracks, which ruins detail.
Identifying the Problem Areas
Before reaching for filler, inspect your kit’s gun assembly. Common void zones include:
- Barrel seams: Where halves of a cylindrical barrel meet.
- Grip panels: Plastic parts that sandwich together.
- Magazine wells: Joints near ammunition slots.
{
“type”: “image”,
“src”: “https://example.com/model-gun-inspection.jpg“,
“alt”: “Close-up of gun barrel seams”
}
Pro Tip: Test-fit parts before gluing to spot potential gaps early!
Essential Tools & Materials
Gather these supplies for seamless void-filling:
- Putty/Compound:
- Tamiya Putty: Fast-drying, ideal for small gaps.
- Vallejo Plastic Putty: Water-based, easy to smooth.
- Milliput Epoxy Putty: Best for deep voids.
- Sandpaper & Files: 400–1500 grit for gradual smoothing.
- Primer: Helps reveal lingering imperfections.
- CA Glue (Super Glue): Quick-fix for hairline cracks.
- Dentist Tools or Clay Shapers: For precise application.
Step-by-Step Void-Filling Process
1. Prep the Surface
- Clean parts: Remove mold lines or flash with a hobby knife.
- Dry-fit parts: Glue only when you’ve minimized gaps naturally.
2. Apply Filler
- For small voids: Use liquid putty (e.g., Tamiya) with a toothpick. Capillary action draws it into tight spaces.
- Larger gaps: Knead Milliput into a putty, press into the void, and carve excess with a damp tool.
{
“type”: “image”,
“src”: “https://example.com/putty-application.jpg“,
“alt”: “Applying putty to a model gun seam”
}
Patience is key: Apply thinly—thick layers crack when drying.
3. Cure & Sand
- Let dry per product instructions (Tamiya: 1–2hrs; Milliput: 4hrs+).
- Sand progressively: Start with 400-grit to remove bulk, then refine with 800–1500 grit.
- Check often: Run a finger over the area—if it feels smooth, it’s ready.
4. Final Checks
- Primer coat: Spray a light layer to highlight missed spots.
- Repeat if needed: Apply filler to any revealed flaws and sand again.
Pro Tips for Gun-Specific Challenges
- Barrels & Cylindrical Parts:
- Wrap sandpaper around a dowel to maintain curvature.
- Mask details (e.g., iron sights) before sanding.
- Textured Grips:
- Use Mr. Dissolved Putty to preserve checkering patterns.
- Moving Parts:
- Avoid heavy fillers; opt for flexible silicone-based gap fillers.
Painting After Filling
Your smoothed surface is now a canvas!
- Prime: Use gray or black to unify colors.
- Paint: Thin layers of acrylics/enamels prevent obscuring detail.
- Weather: Chipping or soot effects add realism to your gun’s “story.”
Common Mistakes to Avoid
- Over-sanding: Erodes delicate details.
- Rushing cure times: Putty shrinks if painted too soon.
- Ignoring test-fits: Gaps often stem from poor assembly.
Final Thoughts
Filling voids in your model kit’s gun might seem tedious, but the payoff is undeniable: a professional-grade finish that stands up to scrutiny. With practice, you’ll breeze through seams and focus on what matters most—bringing your miniature arsenal to life!
Ready to level up? Share your void-filling victories in the comments below! 🔧🎨


