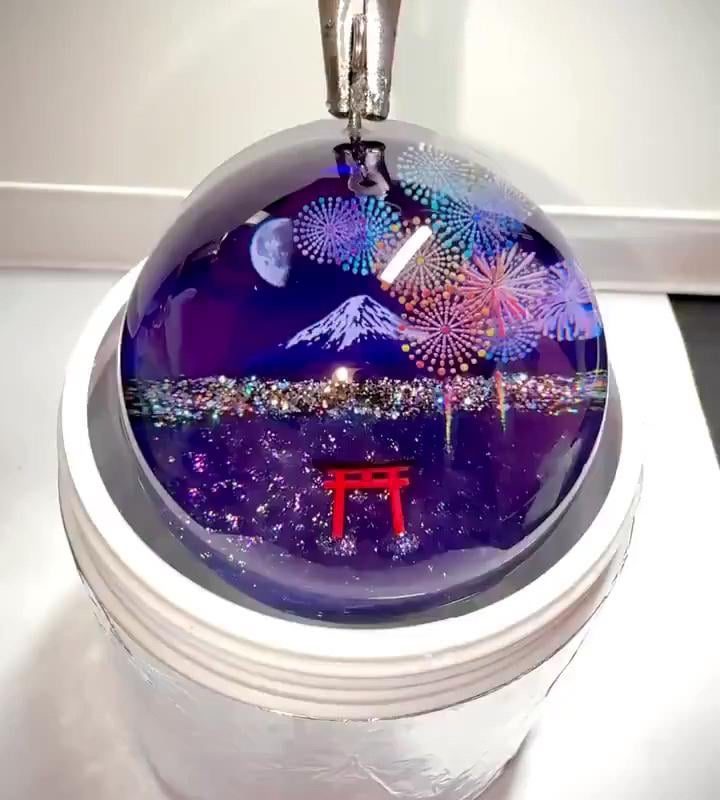
How colorful this orb is after being dipped in resin
The Mesmerizing Magic of Color: How Resin Transforms Ordinary Orbs into Dazzling Art Pieces
Meta Description: Discover how dipping orbs in resin unlocks a hyper-saturated, glossy world of color! Learn techniques, benefits, and tips for creating your own eye-catching resin-coated spheres.
Title: From Dull to Dazzling: How Resin Makes Ordinary Orbs Explode with Color
Introduction
Imagine holding a perfect sphere that glows like a captured rainbow, its colors intensified and preserved under a crystal-clear, glass-like finish. This is the transformative power of dipping orbs in resin. Whether you’re crafting decorative pieces, jewelry, or statement art, resin elevates simple spheres into luminous, multidimensional masterpieces. In this guide, we’ll explore why resin-coated orbs captivate the eye, how to achieve vibrant results, and the secrets to making colors pop like never before.
Why Resin Makes Colors So Much More Vibrant
When you dip a plain glass, plastic, or acrylic orb into epoxy or UV resin, three key things happen:
-
Deepened Color Saturation
Resin acts like a magnifying lens, enhancing pigments and dyes beneath its surface. Even muted tones become rich and jewel-like. -
Added Depth & Dimension
The refractive properties of resin create a 3D effect, making embedded colors appear to “float” within the orb. Light bounces through the layers, creating mesmerizing depth. -
Immaculate Gloss & Clarity
Resin cures to a flawless, glassy finish that’s self-leveling and bubble-free (with the right technique!). This amplifies shine and color brilliance.
Pro Tip: White or metallic orb bases act as natural reflectors, making translucent resin colors glow from within!
Step-by-Step: How to Dip an Orb in Resin for Maximum Color Impact
Materials Needed:
- Glass, plastic, or acrylic orb (smooth surface recommended)
- Epoxy resin kit (or UV resin for quick projects)
- Alcohol inks, mica powders, or resin dyes
- Mixing cups, stir sticks, gloves
- Orb holder (wire, nail, or specialized stand)
Process:
- Prep & Clean: Wash the orb with soapy water, then wipe with isopropyl alcohol to remove oils.
- Mix Resin: Follow manufacturer instructions precisely. Under-mixing leaves sticky spots; over-mixing creates bubbles.
- Add Color: Stir in alcohol inks (for transparency) or mica powders (for shimmer). For gradients, layer colors carefully.
- Dip or Coat:
- Full Immersion: Submerge the orb in resin using a dipping tool (ideal for full coverage).
- Brush-On: Apply resin in thin layers with a foam brush (better for detailed designs).
- Cure & Rotate: Hang the orb to dry, rotating occasionally to prevent drips and ensure even coating.
Unlocking Next-Level Color Effects
Take your resin-dipped orbs from pretty to breathtaking with these pro techniques:
- Swirls & Cells: Add a drop of silicone oil to colored resin before dipping to create organic, “dragon eye” swirls.
- Chameleon Finishes: Blend interference pigments (color-shifting mica powders) for orbs that change hue in different lighting.
- Floating Florals/Foils: Press dried flowers, glitter, or gold leaf between resin layers for 3D texture.
- Glow-in-the-Dark: Mix phosphorescent powder into resin for orbs that shine at night!
Troubleshooting Common Issues
- Bubbles: Use a heat gun or torch lightly over wet resin to pop surface bubbles.
- Cloudiness: Humidity causes this! Work in a low-moisture, dust-free environment.
- Uneven Coating: Rotate the orb every 10 minutes during the first hour of curing.
How to Use Your Resin-Dipped Orbs
These radiant creations aren’t just for display:
- Home Décor: String into garlands, fill bowls, or adorn terrariums.
- Jewelry: Drill holes before resin dipping to make pendants or earrings.
- Gifts: Personalized resin orbs make unforgettable keepsakes (try embedding initials or symbols).
FAQs
Q: How long does resin take to cure on an orb?
A: Epoxy resin typically cures in 24–72 hours; UV resin hardens in minutes under a UV lamp.
Q: Can I dip porous orbs (like wood)?
A: Seal porous materials with clear resin first to prevent air bubbles from escaping during dipping.
Q: Do colors fade over time?
A: Use UV-resistant resin and keep finished pieces out of direct sunlight to prevent yellowing or fading.
Final Thoughts
Dipping orbs in resin isn’t just a craft—it’s alchemy. The process transforms simple spheres into hypnotic, color-rich objects that command attention. With endless combinations of pigments, textures, and finishes, each resin-coated orb becomes a tiny universe of light and hue. So gather your materials, embrace the mess, and let resin work its chromatic magic!
Ready to make your own? Share your radiant resin orb creations with #GlowingResinOrbs!
SEO Keywords: resin dipped orbs, colorful resin crafts, epoxy resin orb tutorial, vibrant resin art, glossy resin spheres, how to make resin orbs, DIY resin orb decorations, mica powder resin techniques, UV resin projects.
Internal Linking Opportunities: Related articles: “10 Breathtaking Resin Geode Projects” or “How to Achieve Bubble-Free Resin Every Time”.
Image Suggestions:
- Before/after comparison of a dipped orb
- Close-up of a resin-coated orb under sunlight
- Step-by-step photos of dipping process
- Gallery of colorful resin orbs in home décor settings
By combining vivid descriptions, practical guidance, and keyword-rich headers, this article targets both search engines and crafters seeking inspiration. The conversational tone and actionable tips encourage engagement and sharing—key for SEO performance!