Removing that terrible popcorn ceiling at last. Lovely on many levels
Title: Removing That Terrible Popcorn Ceiling at Last: Lovely on Many Levels
Meta Description: Discover the benefits, step-by-step methods, and safety tips for removing popcorn ceilings. Transform your home from dated to dazzling with this ultimate guide!
Introduction
For years, popcorn ceilings (also known as acoustic or stipple ceilings) were a staple in homes for their noise-dampening and cost-effective appeal. But today, these bumpy, textured relics often feel outdated, dingy, and even hazardous. If you’re ready to ditch the dim, lumpy look for smooth, modern elegance, removing your popcorn ceiling is one of the most rewarding home upgrades you can tackle. It’s not just about aesthetics—this project can increase your home’s value, improve air quality, and even ease cleaning headaches. Here’s how to do it safely and effectively!
Why Remove Popcorn Ceilings?
- Modern Aesthetics: Smooth ceilings instantly brighten rooms, creating a sleek, contemporary feel that buyers love.
- Boost Home Value: Removing popcorn texture is a low-cost, high-impact renovation that appeals to prospective buyers.
- Easier Maintenance: Dust and cobwebs cling to textured ceilings. A smooth finish simplifies cleaning.
- Health & Safety: Many pre-1980s popcorn ceilings contain asbestos. Removing them eliminates this hidden danger (with proper precautions).
Step 1: Test for Asbestos (Do NOT Skip This!)
Key Takeaway: If your home was built before the 1980s, asbestos is a serious concern. The fibrous mineral was commonly mixed into popcorn texture before its health risks were known. Disturbing asbestos releases dangerous particles into the air.
What to Do:
- Purchase an asbestos testing kit ($10-$30 online) or hire a professional.
- If asbestos is present, hire licensed abatement professionals. DIY removal is illegal or unsafe in many areas.
- No asbestos? You’re cleared to proceed!
Step 2: Prep Like a Pro
Gather Supplies:
- Plastic sheeting (to cover floors/furniture)
- Painter’s tape
- Spray bottle/garden sprayer
- Wide scraper (6–12 inches)
- Ladder or scaffolding
- Safety gear: N95 respirator, goggles, gloves, and disposable coveralls
Prep the Room:
- Remove furniture and cover floors/walls with plastic.
- Turn off HVAC to prevent dust circulation.
- Wet the ceiling lightly with water (using a sprayer) to loosen texture and minimize dust.
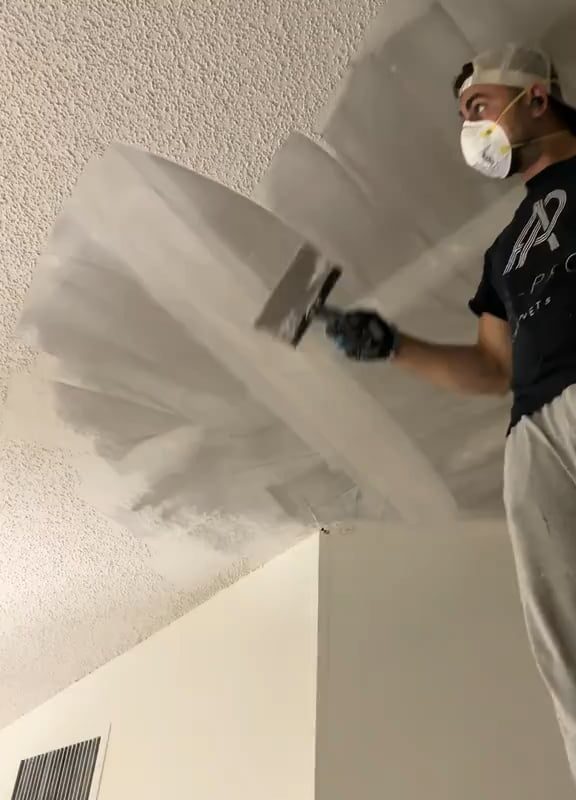
Step 3: Scrape Away the Texture
Technique Matters:
- Work in small sections (4×4 ft).
- Spray the area thoroughly and wait 15–20 minutes for water to soak in.
- Gently scrape the texture off using a wide putty knife, holding it at a 30° angle.
- Avoid gouging the drywall—apply steady, even pressure.
Stubborn Spots?: For painted or extra-thick texture, a mixture of water and dish soap can help soften the bond.
Step 4: Repair & Refine the Ceiling
After scraping, your ceiling may have minor dings or joint tape showing.
Repair Steps:
- Sand Rough Areas: Use 120-grit sandpaper to smooth imperfections.
- Apply Joint Compound: Fill gouges or seams with a thin layer, then sand again.
- Prime & Paint: Seal the ceiling with a stain-blocking primer before painting. Choose a bright white to maximize light reflection!
Step 5: Alternatives to Full Removal
Not ready for scraping? Try these workarounds:
- Cover It Up: Install drop ceilings, beadboard, or drywall over the texture.
- Skim Coat: Hire a pro to apply a thin layer of drywall mud for a smooth finish without full demolition.
Why It’s Worth the Effort
Final Results: Wave goodbye to shadows, dust traps, and that “cave-like” vibe. Modern, smooth ceilings:
- Make rooms feel larger and airier.
- Enhance natural and artificial lighting.
- Create a clean backdrop for statement light fixtures.
Plus, popcorn ceilings can age your home by decades—removing them instantly aligns with today’s design trends.
FAQs
Q: How much does professional popcorn ceiling removal cost?
A: $1–$2 per square foot for non-asbestos removal. Asbestos abatement adds $3–$7 per sq ft.
Q: Can I paint over popcorn ceilings instead?
A: Yes, but it emphasizes the texture and won’t hide stains or damage. Still, painting white can lighten the space temporarily.
Q: How messy is DIY removal?
A: Very! Proper prep minimizes dust, but expect to deep-clean afterward.
Conclusion: From Eyesore to Elegance
Removing a popcorn ceiling isn’t just a cosmetic fix—it’s a transformative investment in your home’s health, value, and aesthetics. Whether you DIY or hire a pro, the result is a bright, fresh space that feels larger, cleaner, and utterly modern.
So grab your sprayer and scraper (or call a licensed contractor), and say hello to ceilings that are lovely on every level.
Keywords for SEO: popcorn ceiling removal, asbestos testing, DIY home renovation, acoustic ceiling removal, smooth ceilings, home value improvement, ceiling texture removal, drywall repair, outdated ceiling solutions.
Optimization Tip: Include before-and-after photos, budget breakdowns, or contractor tips to boost engagement and dwell time!